Monday 17 December 2012

Photography in the NSW Goldfields

I recently spent a few days travelling through the Hill End and Sofala district  with a view to running a landscape workshop there some time next year. For a photographer it's an interesting region: packed with historic houses, mining memorabilia, old pubs, rickety buildings and loads of other fine objects just groaning to be photographed! While Sofala is tiny - you can walk round it in 20 minutes - Hill End is physically spread out over a large area. Its current population is around 150, down from 8,000 in 1870. Most of the houses are gone but there's a good sleection of pubs, churches and other significant civic buildings to entertain a passing photographer. Meanwhile I'll be putting together an itinerary and announcing a short weekend workshop in the New Year. Watch this space!

'House Number One'. On the road between Sofala and Hill End
Hill End has a good collection of old mining equipment. This is an HDR shot of a US-made crushing plant powered, originally, by a steam-powered traction engine.
Beyer's cottage, Hill End
Slightly dilapidated row of wooden cottages in Sofala
View of Hawkins Ridge from the Hill End lookout. The Ridge was home to dozens of gold claims that sank on average, more than 100 metres into the hill beneath the ridgeline in the centre-left portion of this HDR panorama.
Impending storm racing over a ridge on the Sofala to Hill End road
Road markers on the Sofala to Hill End road
Public bar, Royal Hotel, Hill End
Renovation nightmare in Sofala
Royal Hotel bar, Hill End
Close up of the beer taps, Royal Hotel in Hill End

Friday 7 December 2012

Memory Cards and Speed Classes


There are now fewer types of camera memory card to choose from in terms of form factor  (remember those ultra-thin SmartMedia cards from a few years ago?). Those types remaining offer an increasing range of performance features. Secure Digital and Compact Flash cards are currently the dominant memory cards in the digital camera market, along with the SD variants: Mini SD and Micro SD cards (used mostly in phone cameras and other portable devices).

Memory cards come with widely different data capacities, as well as with different recording speeds. As new technology develops so the maximum possible capacity of the card increases. This has given us yet more standards to digest. For example: SDHC, and the newer SDXC capacity cards.
SDSC (standard SD cards) had a maximum capacity of 2Gb.
Secure Digital High Capacity cards come in capacities up to 32Gb.
Secure Digital eXtended Capacity cards can accommodate up to 2Tb - although the highest-rated SDXC card currently sold is 'only' 128Gb. Increased SDXC capacities will be commercially available in the near future.

The other main characteristic of a camera memory card is its read/write speed - essentially how fast it can record the data from a fast-shooting camera plus read and play back data. This is where we can get a bit confused. Most cards record data at a variable rate, depending on the shooting situation (blue sky versus a forest: plain tones record faster than busy tonal images), the type of file (i.e. JPEG or RAW) and the type of connectivity (Firewire, USB 2.0 or 3.0).
Even more important is the (often overlooked) fact that cards don't record and write data at the same speeds. This might not be so significant for recording single still images, but it seriously impacts when shooting high resolution RAW files and video.


Early in the development of camera memory cards, these speeds were always quoted as a multiple of the original CD ROM, 150kB/s burn speed (approx 1.23Mbit/s).

For photographers a better way to describe card performance is a data rate measured in megabytes per second (MB/s). I think we photographers understand megabytes better than 'megabits'. i.e.
16x     = 2.24 MB/s
32x     = 4.69 MB/s
48x     = 7.03 MB/s
100x   = 14.6 MB/s
200x   = 30 MB/s
1000x = 150 MB/s

Currently there's a slightly simpler 'Class' system used by the SD Association to give consumers a quicker idea if a card is suitable [principally] for shooting big files or for video. The Class System displays the minimum performance of the card in relation to specific applications.


The SD Association defines standard speed classes indicating minimum performance to record video. Both read and write speeds must exceed the specified value. These are defined in terms of suitability for different applications:
Class 2 for SD video recording
Class 4 and 6 for HD - Full HD video recording,
Class 10 for Full HD video recording and HD still consecutive recording

UHS: Even Faster SD Card Standards
The Ultra-High Speed (UHS) designation is available on some SDHC and SDXC cards.UHS Speed Class 1 is designed for real-time broadcasts and large-size HD videos. UHS-I SD cards can transfer 104 MB/s. UHS-I is the only class for which products are currently available.
UHS-II cards (when commercially available) will further raise the data transfer rate to a theoretical maximum of 312 MB/s.
Note also that UHS memory cards work best with UHS host devices. The combination lets the user record HD resolution videos to tapeless camcorders while performing other functions. It's also suitable for real-time broadcasts and capturing large HD videos.

UDMA: Even Faster CF Cards
UDMA, or Ultra Direct Memory Access technology greatly increases write speeds as well as read speeds when the card is inserted into a UDMA-enabled reader.  Currently the fastest CF cards comply with UDMA 7 standards, providing 150 Mb/s write speeds and 20 Mb/s write speeds. As with the UHS standard, this super-fast performance is only possible when using UDMA  enabled cameras and card readers.

Monday 12 November 2012

Broken Hill Trip

Mid-October saw us drive, fly and train it to Broken Hill, 1200+km from Sydney, for a four-day photo shoot. For me it was well worth the drive as the outback looked great, with plenty of vegetation and heaps of wildlife. Including more emus than I have ever seen, kangaroos of every shape and description, and of course a fabulous amount of flowers and birdlife.
Here's a selection of some of the best images submitted as part of the final feedback session. Some beautiful work..

Sculpture Park by Belinda Baccarini

Gumnut close up by Belinda Baccarini
'Do the right thing', sign seen in Broken Hill's city cemetary by Gordon Chirgwin
'We forget', Broken Hill City cemetery.
Pic by Gordon Chirgwin
Argent Street, Broken Hill HDR by Kerrie Dixon
Impressive sunset, Sculpture Park by Kerrie Dixon
Outback cemetary, Broken Hill by Marietta McGregor

Sheep pens at Kinchega woolshed, Menindee lakes area, by Marietta McGregor
Woolshed still life HDR by Mary Barnes
Backlighting in the Silverton Tea Rooms. HDR by Mary Barnes
Old tool shed at the Kinchega woolshed complex.
HDR pic by Natalie Hitchens
Close up of bottles and antique artifacts. HDR by Natalie Hitchens
Wool baling machine. HDR by Phil Young
Under the gum trees in a dry creekbed. On the road to Mutawintji national park by Phil Young
Rugged country around Broken Hill by Steve Mullarkey

Silverton HDR by Steve Mullarkey

Menindee Lakes by Tina Brauer

Kinchega woolshed by Tina Brauer

Thursday 8 November 2012

Shooting Cars

Though I've never shot cars for a living, I have worked (briefly) with people who do and appreciate how hard it is to get the right look when trying to make the car appear the only thing you ever wanted to own or drive. Currently that trend includes trying to make the vehicle appear to be moving at speed through some exotic landscape that evokes the ideals of 'freedom', 'escape' and 'style'.

I have to smirk at that thought - years ago I recall a colleague in Sydney bought a new Suzuki jeep. At the time it was a very cool 4WD to have and was badged The Freedom Machine - the advertising of course implying you only had the open road ahead of you, and, once in possession of the vehicle, a partner and happiness were only a step away. After a few weeks of driving this new machine she confided that it wasn't quite the 'freedom' she'd envisaged. "The repayments soak up half my income and I always end up working overtime to keep up, so never get to drive other to work and back every day...".  Such is life. Ever since then I've bought cheap, second-hand cars and travelled the open road as often a spossible...

On my recent road trip to Broken Hill I saw an opportunity to create my own version of that eternal advertising icon: the car shot.
The trick lies [mostly] in picking the right time of day, in this case, dusk, the right position (of the vehicle and camera) and ultimately for this look, the right lens. We parked on a slight rise with the sun setting behind the vehicle. I positioned myself at a very low angle 70metres off and shot with a 70-200mm lens. The image was made at full 200mm magnification with the EOS MkII, f2.8 @ 1/100s (an appropriate camera to shoot the VW EOS I thought..).

This is what the base file looked like after three different exposures were put together using Photomatix Pro
I was quite pleased with the final result - in retrospect I could have fired a few speedlight bursts [wirelessly] into the wheel arches to give the underside a bit of a lift, but for a quick car shot, I think it worked OK. The very low shooting angle is especially useful in creating a different and strong compositional angle. This would NOT have worked if I'd simply stood in front of the vehicle and snapped at head height. Getting down low also removes a lot of annoying and completely unnecessary background clutter.
Here's a close up of my other vehicle Ha! Actually this is from the Mad Max 2 museum in Silverton
Now that's a donk!

Tuesday 6 November 2012

Outback Cemeteries

There are tens of thousands of cemeteries dotted throughout Australia brimming with tragic and beautiful stories. Ordinary people who have done extraordinary things, people dragged down in tragedy, poverty, disease, accident and human error.
Visiting one of these places is a fascinating experience, especially if you can do a little bit of reading about the history beforehand. Broken hill cemetery, for example, holds victims of the infamous Battle of Broken Hill (also known as the Picnic Train Massacre) where two disgruntled Muslims, angry over a series of essentially racist actions by the townsfolk, ambushed a group of white Australians on their way to a picnic on the local train. The would-be dacoits hid in the countryside three kilometres out of town and took pot shots at the train, killing and wounding several locals before they rallied round and chased the perps down and killed them. Each cemetery has its own unique and moving tales - some of which are revealed in the headstone inscriptions and some through a bit of research...

Bad luck comes in fours? Headstone in Wellington cemetery
Sometimes the simple graves are the most moving (Broken Hill cemetery)
Once all the relatives have either passed away or moved on, there's no one to look after the graves in these remote, hot and barren places (White Cliffs)
Lone angel in Broken Hill's town cemetery

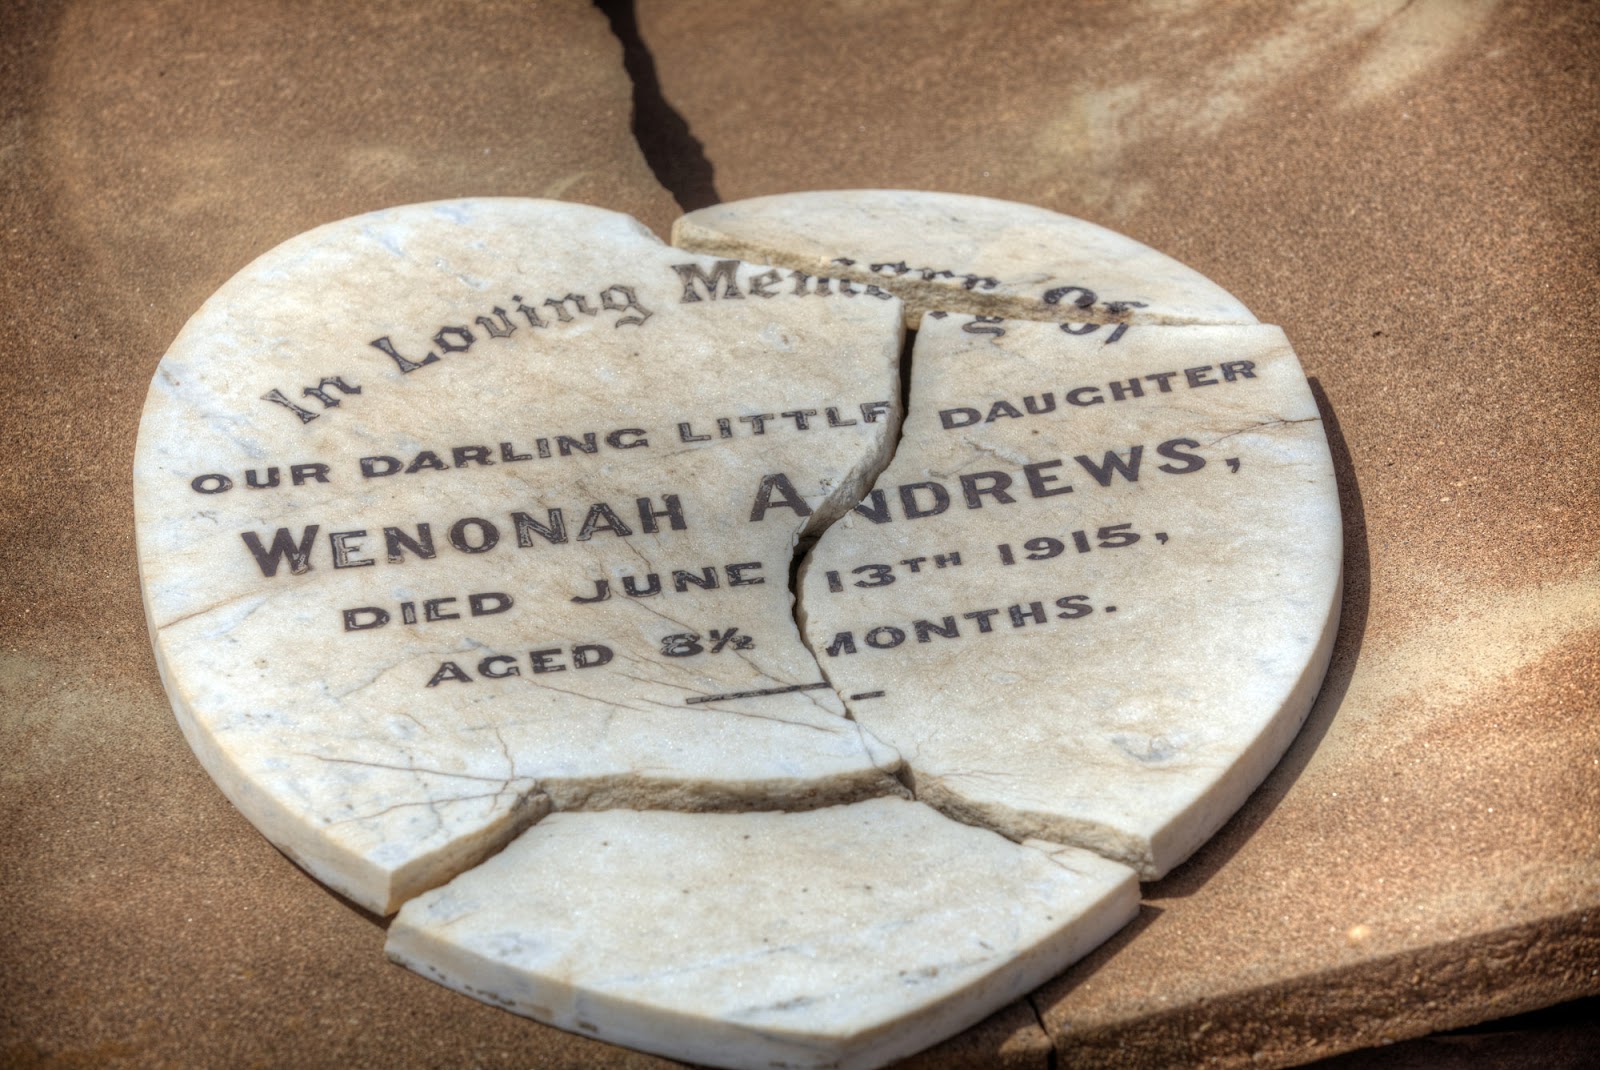
Broken heart and broken headstone in Broken Hill
Black-and-white infra-red shot from Silverton cemetery
Cemetery at Silverton. Although most of the houses have been uprooted and the materials shifted back to Broken Hill, the cemetery remains. All 40 acres of it. It's an incredible place, covered in small shrubs, brimming with butterflies and bird life. This is an infra-red black and white image made with my converted EOS 400D.
Blighted Hopes indeed. Silverton cemetery, Canon EOS 400D infra-red
Some outback cemeteries seem to be almost exclusively populated by young children
A lone grave marker in the equally barren and exposed cemetery at White Cliffs
One of the best headstones I found at least, Broken Hill cemetery

Tuesday 30 October 2012

Photo to Pastels

Original image captured in Bayamo (I think) by photographer Leo Gasparet

It's one thing to have the skill to convert a digital photo to something that equates to a painting. It's an entirely different skill to actually copy a photo using real pastels or oils and to transform it into a real work of art. My sister does this - working off one of my student's images (Leo Gasparet), she created this great-looking reproduction. Best thing to do with a (digital copy) picture like this? Print it on watercolour inkjet paper.

Here's a great example of how the translation from digital image to art is done - created by Fiona Nichols. No photo manipulation or software tweaking involved.

Sunday 21 October 2012

Shooting star trails


One of the hardest things to 'get right' is shooting star trails. There's no light, or precious little, so it's hard to get a good, clean result.
Cameras set to Auto-everything apparently do this quite well because, on Auto, the ISO gets  cranked to the max. In today's world this means a minimum of 3200, in many cases the ISO goes considerably higher so it produces an image. However, look closely and you'll see a lot of ugly colour noise and image artifacting. Maybe not so nice. 

The best way I know to get 'clean' star trails is to keep the exposure short. Doing this gives a clean shot but not much in terms of a significant light 'trail'. So the answer is to shoot multiple short shots and put them together in post.
The recipe you see here is ISO 200, f2.8 at four to five minutes. The trick is to then shoot a second and a third frame immediately. Here I hesitated a bit too long - which is why you see some gaps inbetween the frames assembled into the 'master' file above.
I shot nine frames, selected, copied and pasted each into one 'master' file then changed the layer Blend Mode on each layer to Lighter Colour so the trails shine through each layer and, hopefully, join up into one continuous trail. For the last frame I shone my torch into the grasses for 20 seconds to add a bit more depth.

Top star trail tips:
1: Set up before it's 100% dark to get the best framing and focus set. Use Manual Focus and maybe tape the lens focussing ring with masking tape so it can't be accidentally nudged.
2: As an alternative, set the focus to Mountain Mode (i.e. infinity)
3: Lock off the tripod and make sure you don't nudge or bump the legs. It's easy to upset hours of work...
4: ISO 100-200
5: Aperture f2.8
6: Shutter to BULB - use an intervalometer set to five minutes
7: Make a test shot. Re-calibrate with a longer/shorter exposure where necessary.

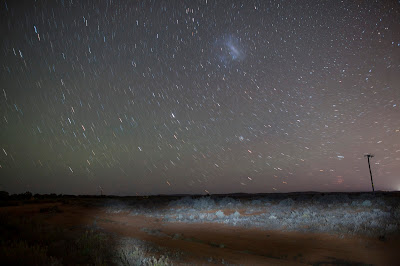
This is one exposure of five minutes with a short burst from my torch to add some detail in the foreground. You can clearly see the earth's rotation in this frame but it's not enough to provide the full effect. The more exposures you shoot, the more spectacular the effect
As an adjunct to this story, as we set up for this shot, 16km out of Broken Hill, we all heard a moaning sound coming from the supposedly deserted pub at the side of the highway. After ten minutes of this eerie noise it changed to a mournful human 'heeeelp'. We walked over to the fence to see a half naked man face down in the dirt on the other side. Gordon, one of the star trail team, leaped into action, forcing his way through a steel frame fence round the back  in an attempt to locate the body. We followed with flashlights and a doctor (I never travel without one). Gordon found the guy and Dr Natalie performed a quick check of her 'new' patient to establish the damage. He didn't appear to be hurt too badly but at the same time he was far too weak to right himself and would have stayed like that all night, perhaps even longer. That far out of town, you are definitely on your own. By the time the ambos turned up, assessed the patient and ferried him off to hospital we were all a bit rattled - but we still got the shot. It was quite a night...