Sunday, 21 October 2012
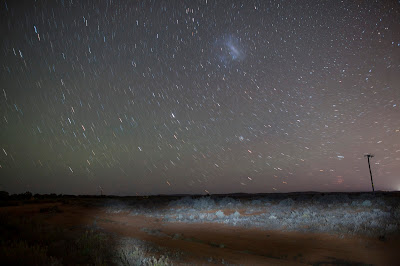
Shooting star trails
One of the hardest things to 'get right' is shooting star trails. There's no light, or precious little, so it's hard to get a good, clean result.
Cameras set to Auto-everything apparently do this quite well because, on Auto, the ISO gets cranked to the max. In today's world this means a minimum of 3200, in many cases the ISO goes considerably higher so it produces an image. However, look closely and you'll see a lot of ugly colour noise and image artifacting. Maybe not so nice.
The best way I know to get 'clean' star trails is to keep the exposure short. Doing this gives a clean shot but not much in terms of a significant light 'trail'. So the answer is to shoot multiple short shots and put them together in post.
The recipe you see here is ISO 200, f2.8 at four to five minutes. The trick is to then shoot a second and a third frame immediately. Here I hesitated a bit too long - which is why you see some gaps inbetween the frames assembled into the 'master' file above.
I shot nine frames, selected, copied and pasted each into one 'master' file then changed the layer Blend Mode on each layer to Lighter Colour so the trails shine through each layer and, hopefully, join up into one continuous trail. For the last frame I shone my torch into the grasses for 20 seconds to add a bit more depth.
Top star trail tips:
1: Set up before it's 100% dark to get the best framing and focus set. Use Manual Focus and maybe tape the lens focussing ring with masking tape so it can't be accidentally nudged.
2: As an alternative, set the focus to Mountain Mode (i.e. infinity)
3: Lock off the tripod and make sure you don't nudge or bump the legs. It's easy to upset hours of work...
4: ISO 100-200
5: Aperture f2.8
6: Shutter to BULB - use an intervalometer set to five minutes
7: Make a test shot. Re-calibrate with a longer/shorter exposure where necessary.
As an adjunct to this story, as we set up for this shot, 16km out of Broken Hill, we all heard a moaning sound coming from the supposedly deserted pub at the side of the highway. After ten minutes of this eerie noise it changed to a mournful human 'heeeelp'. We walked over to the fence to see a half naked man face down in the dirt on the other side. Gordon, one of the star trail team, leaped into action, forcing his way through a steel frame fence round the back in an attempt to locate the body. We followed with flashlights and a doctor (I never travel without one). Gordon found the guy and Dr Natalie performed a quick check of her 'new' patient to establish the damage. He didn't appear to be hurt too badly but at the same time he was far too weak to right himself and would have stayed like that all night, perhaps even longer. That far out of town, you are definitely on your own. By the time the ambos turned up, assessed the patient and ferried him off to hospital we were all a bit rattled - but we still got the shot. It was quite a night...
Subscribe to:
Post Comments (Atom)


No comments:
Post a Comment