Wednesday 26 January 2011

Heritage Fleet Shipyard

Hey everyone, the guys at the Sydney Heritage Fleet's dockyard were kind enough to show me round yesterday - so I could get an idea of what to expect, photographically, when we visit Feb 5th (selected invites only I am afraid...). The yard is there to refurbish, rebuild, restore a number of marine vessels to a pristine state. Many of you might have seen the tug Waratah chugging up and down the harbour from time to time - this is where she's berthed, alongside the John Oxley, the ferry Kanagra, the schooner Boomerang, the launch Protex and the steam launch Hopetoun, among several others. 


Most of this activity is invisible from the City West Link and Victoria road going into the city so it was an amazing discovery. Most of the vessels are in a dilapidated state but are being pored over by anything up to 30 volunteers, welding, hammering, riveting and repairing the various vessels. It's great to see such projects being undertaken where there's little or no financial backing.

Saturday 22 January 2011

Travelling with Digital Cameras

Travelling overseas can be a hassle with multiple cameras, batteries and other electrical gear. You'd be amazed at just how much junk we pack in order to leave home. Here are my thoughts on what's best to take, with options depending on whether you are a big shooter, or not. Adapt or modify this list according to your weight and baggage requirements. Also note, I'm not a qualified electrician so at any mention of soldering or altering store bought products do so at your own risk.

Power leads. Why take three or four when three spliced into power cable will do? Take three power cords and cut the ends off at 6, 8 and 10 inches. What I did then was strip the outer protective plastic off the two inner wires on each cord, then spliced all three cords, making sure that the live cable (brown) for each was longer than the neutral blue wire. Doing it this way means that even if someone stamps on the cables wearing hobnail boots and bares one, or both wires there's NO chance of an electrical short, as neither are opposite each other. Each is first carefully soldered together (don't burn the protective plastic covering) then covered again using electrician's shrink wrap (Note that as this is a tube, it has to be slotted over your cables BEFORE you start soldering). Heat it with a hairdryer and it reduces significantly in size to give a snug, insulated finish. I also bound electrical tape round the junction for more protection. This cuts weight, bulk and tangles significantly.
Camera charging. If you are a big shooter (i.e. 6-10Gb image files/day) you'll need to charge multiple batteries at one time. Two ways to do this. I use two different DSLRs + a compact camera (more problems) so pack three Canon chargers. These are actually compact and lightweight. You could tape them together to save them getting lost in your case or deal with each separately (below).
If you have two of the same cameras, the Hahnel Powerstation Twin V Pro is one good option - charge two at the same time using only one power cable.
Hahnel also make a Universal Charger - you swivel the screws at the end of the unit to match the position of the battery terminals - making it capable of charging/fitting any DSLR battery.


I've seen people travelling with 6 socket power boards! This is massive overkill. Rarely do you need more then two sockets at one time! I found this neat little travel power board in Officeworks ($18). The cable is just the right length for most hotels and, when not in use, wraps around the socket. There's a flexible tie for holding it in neatly. If more sockets are needed, take a dual Aussie adaptor - cheap and light.
Very compact dual travel socket
Take a laptop not a netbook! Easy for me to spend other people's money, but from experience, a netbook is certainly not powerful enough to do anything other than email, WORD, surf the 'net. A notebook or laptop on the other hand can be light, very powerful and great for editing on the road. If you are shooting a lot while traveling, having a few hours each day to check the work and edit on the road makes it so much easier when you get back

Take a laptop! It's so much better to get ahead with a bit of sorting, editing and processing before you get home - that way, if you plan on a digital picture book, you arrive home with a big chunk of the process already completed. This is the new Apple AIR - very small, incredibly thin, weighs 1.1kg, battery lasts 5 hours, fast processor and enables you to watch DVDs and movies while on the road. Awesome machine for $1200.
Sony and others have equivalent type machines designed for performance and light weight - particularly the Z series of Vaio laptops. Faster, more storage, more features than the AIR but also more expensive. Also get yourself a good neoprene type bag for the laptop. As a suggestion, load the software that you plan to use but bring copies of the CDs with you in case there's a disk error while on the road.
If laptops are not your thing, consider getting a portable storage device. This could be a model like the Canon M80 - an 80Gb hard drive with a 3-inch screen - plug the CF card into the device and it copies everything (also takes SD cards). Images and movies can be loaded onto its hard drive and then viewed on the screen, or on a TV screen using the supplied cable. Has a headphone jack for listening to movies and sound files. You can also do this using an Apple iPod (only with some of the larger models). Holds about 20,000 images.
Memory cards are all basically the same other than the fact that they read/write at different speeds - this is only really relevant if you shoot HD video or shoot high resolution images in fast drive mode. I'd probably recommend the middle speed - currently at 60Mb/s. Expect to pay about $99, $150 and $280 respectively.

Wednesday 19 January 2011

BookMaking class for 23rd Feb, 2011

Today (Jan 19) CCE just announced the release of a new Photo BookMaking class Wednesday Feb 23rd at CCE's HQ in Newtown. Class provides students with a sound start in the art of making books, while providing those with some experience with techniques to transform their books into something out of the ordinary. A great value day...

Tuesday 18 January 2011

Developing a New Point of View

One of the things nearly all of us do, as photographers, is to shoot from the same point of view. We tend to do this all the time. I'm as guilty of this as everyone else is but, from time to time, I try to break out of the predictable, and try something different. I have been shooting a fair bit of video recently and decided I wanted to make a short movie in the park where I walk most mornings. My dogs are the models of course (responding well to food and other bribery - and no fees to pay...) so I decided to shoot from their point of view (i.e. from a height of three inches).
Here's the resulting movie...

Bark in the Park from Robin Nichols on Vimeo.


I attached two tripod heads together and attached the double rig to a Velbon monopod (the handle). Because there are 2 heads, you can angle the heads so that the second head is in the normal vertical position and attach the HD Video DSLR as normal. This worked well for both my EOS 5D MkII and a Canon Powershot SX30IS - the latter had the distinct advantage of having a flip-out LCD screen to act as a framing aid as I was running along - but more importantly, its image stabiliser really made the results look considerably more stable. Just as well because the resulting footage was jerky. The film was edited in Adobe Premiere Elements 9.0.

Creating a different point of view from Robin Nichols on Vimeo.

The Benefits of Online Shopping

In recent media beat-ups some of the financial losses that Australian retailers are apparently suffering was blamed on Internet shoppers. Even Gerry Harvey was trotted out in front of the cameras to spout outrage at the loss of revenue to overseas retailers. "We must TAX them" came one idiotic suggestion, and in typical hysteria-laden headline-grabbing fashion, others joined the fray. Without thinking it through, or doing any research.


I say 'idiotic' because, in the same news piece, the journalist quoted a consumer buying jeans in the US at less than half the price of the Australian cost. So, even if they were charged 10% sales tax and let's say, another 10% penalty tax for being unAustralian, buying jeans overseas would still be a no-brainer. Hopefully others appreciated the foolishness of the 'let's introduce another tax' suggestion.

I'm sure it's not the salaries paid to retail workers that are driving shoppers overseas, and it certainly ain't the value of the dollar. I think it has more to do with escalating council rates and exorbitant rents, something we never hear about in these instances. For example, most traditional photo retail businesses are located in city centres or big shopping centres - the most expensive place anyone could choose to run a business from. Yet those that move into the cheaper, slightly less salubrious areas can afford to sell photo gear cheaper. This is not rocket science.
While some in the industry feign outrage at this claimed loss of income ask yourself this: why is it cheaper to buy a brand new Pentax K5 from Ryda Car Radio than it is from a specialist camera retailer in the city?
Why does a new MacBook Pro (17-inch screen model) cost $500 less in the US than it does in an Apple store here? As far as I know these are made in Singapore so it can't be the shipping costs, OR the exchange rate.
And why does an inkjet cartridge for my photo printer cost A$28 at Officeworks while in the States the same refill costs US$15, and in Japan it costs A$10. The same refill! No wonder people look overseas when all we get here is an inflated price and more often than not, poor service. I know it's easy for me to sit at my computer and blab on about 'how things are so expensive' but it not just me. Everyone that travels overseas realises just how expensive Australia has become. Clearly there are different taxes and import duties to take into account when comparing the US with Australia. Plus the States has a massive buying power so it can get bigger trade discounts from the same Japanese manufacturers we buy from. Even so...


I talk to locals, visitors from Europe and Japan. Australia is fast getting a rep for being a rip-off nation, and not just for photo-related items. For nearly everything, including food. Most people I deal with in the photography market shop overseas for three very good reasons.
- Firstly you stand to save a packet, even when the tax and shipping is accounted for.
- Secondly, you get access to a range of (photo) gear that far exceeds what can be found in this country and,
- Thirdly, even though you might not get a genuine warranty the turnaround and overall service (including returns, queries and complaints) is for the most part exceptional.


I appreciate that you get good personal service in many of the local photo stores - for years I have supported Paxtons because I've known one of the store managers there for several years and know she always gives fair and unbiased advice. But that said, a big chunk of sales go overseas simply because it's cheaper. Many Australian companies would go broke if it weren't for the fact that they bring in significantly cheaper Chinese products. 
Maybe we should stop cheap imports across the board and see where that gets us...

Thursday 13 January 2011

Gettin' Shaped: First Rant of 2011

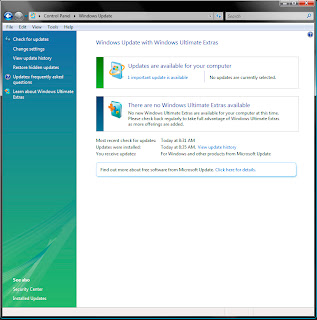
I know it's only data. And to many this might sound trivial, but I have recently become aware of just how much downloadable bandwidth I'm losing via programs like Windows, Apple, and, OMG, Adobe. They can gobble up a bandwidth allowance simply by updating your precious software with all their regular Important Updates
I recently changed my service provider so have a slightly different data allowance. The 'big print' in the contract tells you that you have 'unlimited downloads'. But, of course, the small print stipulates that once you go past a set amount, in my case 10Gb a month, the download speed  becomes shaped. Don't you just love that terminology? In plain English it means that means a trip back  to the dark ages of the 28.8kbps modem.  The "Why bother at all" speed. 
To cut a long story short, I got shaped at an inconvenient time (isn't it always inconvenient?) just when I needed to upload some data to a publisher in the UK. 
I got onto the bog and bone and persuaded the nice person at the telecom to throw the switch back to normal speed, just this once which saved the day. When I had time to check, I realised that my bandwidth had disappeared partly because of the voracious data download diet of Messrs. Gates and Adobe.

Like most computer users, I have my OS set up to download updates automatically. Never again. This inevitably occurs in the background which also explains why, at certain times, the computer begins to run like a wet blanket.
 

I suspect most of us are scared into implementing this update regardless in order to stave off any possible hacker intrusion or virus outbreak. Fair point, but if you check your download manager and look at the downloads, a lot of it is media for programs live Windows Live, Powerpoint, Word - clip art and templates. Non-essential stuff most of us never use. 

I opened up Windows Update and sure enough there was another 500Mb of 'important updates' queued up. And that was just from Microsoft! And there was another 550Mb of updates waiting from Adobe. I have three computers which means, if I leave it on 'automatic', I'm about 3Gb of bandwidth behind the proverbial 8-ball before I even start Firefox. 

I now check Windows Update on a regular basis and read the small print to decipher just how 'vital' or important the updates really are. That way at least I can keep prevent myself from being shaped when least expected.
And while I'm on the subject of improvements, every month I seem to get a download from Adobe for Bridge (among a lot of other stuff). The funny thing is, after months of updating, Bridge still freezes and crashes three or four times a day, regardless. Anybody else experience this, or is it just me?

Tuesday 11 January 2011

Video Editing Frustration: NYE Fireworks

I've been playing about with the HD Video features on the Canon EOS 5D MkII recently to get more experience in shooting and, more importantly, editing the resulting footage. Editing is always the frustrating bit. I love to shoot video, but turning it into 'watchable content', that's the hard bit.Here are a few operating tips that you might find helpful:
1: Decide on the right software first off. By 'right', I mean software that's easy, does a good job, is stable and doesn't cost the earth.
2: Work out if your computer is powerful enough to drive the software correctly or, as I found out, whether it's just going to be a frustrating road of stop/start, stop/start delays/crashes and hangs.
I began using Adobe Premiere Elements 7.0 because that's what I had. At first it seemed OK and, as a low cost video editor, it can do good stuff. It also has a bunch of professional features and a very cool Instant Movie feature that allows you to create a movie simply by opening a few clips and letting the software do the rest. Here's an example:


One problem with PRE 7.0 is that, even after repeated 'Saves', once the app is re-opened it loses contact with the media - you get an Offline warning. You don't have to make all the links again (thank God!), simply select everything on the timeline (video, images and sound clips) right-click, then choose the Enable function. Turn it off then turn it on again - this 'refreshes' the code somehow so everything reappears as online - a frustrating waste of time. The Internet is packed with threads from frustrated video editors because of this error. It's less prevalent in PRE 9.0...

3: Interestingly, the footage shot on any DLSR might not be the best format for editing - PRE prefers DV AVI files - the Canon 5DMkII saves Quicktime .MOV files so, unless these are converted somehow, the edit workflow does get slower. The biggest hurdle is in being able to view work in real time. That is, being able to scroll through the frames seamlessly without the vision appearing jerky. Whenever a change is made to a video clip in PRE's timeline, that part of the clip must be rendered for smooth playback. Rendering takes time, especially if there's not enough HDD space, not enough RAM or the CPU is slow. It's a major point of video editing frustration. Anyway, I got over this by instigating as many changes as possible before rendering each sequence - I must have rendered this movie more than 200 times before it was finished.


Then I discovered Windows Live Movie Maker for Windows 7. It has a number of advantages over PRE:
1. It appears to be stable (i.e. never crashes)
2. It's easy to use
3. Has a good range of transitions and effects
4. Has a sensible output window (easy to choose the correct format for finishing the movie file. PRE is a bit unclear and in my opinion provides too many options)
5. The BEST bit is that as it imports files, they get converted to a more efficient low res format that's FAST to work with  -  you can drag the cursor through the timeline to accelerate, replay, or go slowly, and it never flickers or jams like PRE does.
Disadvantages:
- Editing scope is limited
- You can't over-dub sound or video
- You can't modify sound files
- There are no post-production effects possible on the clips (lightness, colour, contrast) but, as the adverts claim, it's simple and easy. I love it. Here's one I just finished using Movie Maker:

Wednesday 5 January 2011

Photomerge Content Aware Fill Brilliant for Panoramas

Elements 9.0 has a new slant to its Photomerge Panorama feature: Content Aware Fill.

How often do you get ragged edges to your stitched panoramas?
All the time right?
Elements now offers a Clean Edges feature - click 'OK' and wait, in some cases, wait quite a few minutes, and voila! The edges get filled in with the content from the inside of the frame. The result is excellent. 

Now I have only tried this on a couple of panoramas so far but both looked almost seamless - it was very hard to pick what was copied and where the join was. Excellent job. 
If the panorama ends up with a lot of transparency areas around the edges (the chequerboard pattern) the Content Aware Fill does not work so convincingly. It makes mistakes simply because it has to copy so many pixels from the inside of the frame. Otherwise, this is an impressive advance on the regular stitch-then-crop action from version 8.0.

Tuesday 4 January 2011

Tram Sheds Revisited

Composite of four images: Two trams in the sheds, Uta in the tram cabin, Fabian in the front and Christa sitting on the left-hand side by Mike Clements. Mike processed the main tram shed shot using the freaky detail technique (as described in a previous post). Each of the other three sections were run through the same detail enhancer twice. Viveza was used to highlight the trams and to darken the background details. Dark shady areas were selected and adjusted using Curves to reveal more detail. Each of the two layered people (outside the tram) were duplicated. Each duplicated layer was then adjusted with a Darken Blend Mode; twice, to bring the figure layers in line with the background layer. Each figure was then Dodged and Burned for further group authenticity.
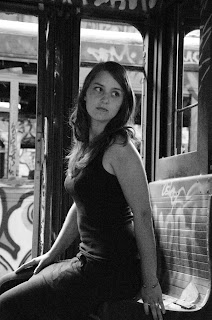
'Uta' by Robin Nichols. Canon EOS 5D MkII, EF24-70mm, 580 EXII speedlight off-camera, with 1/8 inch honeycomb grid (to restrict the spread of light around the model's head). Image was post-processed using Portrait Professional and converted to monochrome in Photoshop.
Uta photographed in the tram sheds by Mike Clements. HDR
Fabian photographed in the tram sheds. BW HDR by Mike Clements.
Fabian and Christa, tram shed HDR by Mike Clements.
Uta in one of the few remaining trams. (Canon EF24-70mm, 1/6s @ f6.3, speedlight with 1/8 inch honeycomb set at 1/4 power upper left hand side of frame). Single shot HDR, post-processed using Photomatix Pro and Silver Efex. Pic by Robin Nichols
Another shot of Uta. (This time I was using the handy EF85mm f1.8 (shot at f2.8) to isolate the subject from the background as much as possible. Natural light with speedlight (fitted with a 1/4 inch honeycomb grid) fired through the window to the model's right. Single shot post-processed using Photoshop and Nik Silver Efex. Pic by Robin Nichols
Another shot of Uta. (Canon EF85mm f1.8) to isolate the subject from the background as much as possible. Natural light with speedlight (fitted with a 1/4 inch honeycomb grid) fired through the window to the model's right. Single shot post-processed using Photoshop. To make the skin tones glow a bit I converted the original colour image into black and white using the Channel Mixer, then added a deeper black and white effect using Nik Silver Efex. Pic by Robin Nichols
Great wall art captured by Dianne Clements
More great wall art by Dianne
Barely graffiti - more like an example of gallery art? Another beautifully finished pic from Dianne Clements
Click on the image. This study of reflections by Janice Gursanscky looks even better BIG!
Classic looking portrait of Uta from Janice - very moody lighting - I liked this set up because it has such a strong 'sixties' feel to it. Good job Janice

Very graphic graffiti from Janice Gursanscky
FIVE more from Graham Robinson using his new Pentax K5. Ooooh!
Christina by Graham - again the K5
Great graffiti by Graham
Uta, shot by Graham with the K5 set to ISO 51,200.
No, that's not a typo. Not bad -= the grain in the resulting image is gritty but appears more like regular T-MAX 3200 pushed a couple of stops. There's almost no colour noise in the colour version...


Last one is interesting as this is an in-camera HDR shot, again done with the Pentax K5. More on this cool new feature in later posts...