Friday 25 December 2009

Adding Texture with Blend Modes


Blend Modes is a feature that's notoriously hard to describe in words. Not because it's boring or ineffective but because each Blend Mode (and there are lots) produces a totally different reaction with each image it is used on. Well, that's my excuse as a writer anyhow...

There are two ways to access a Blend Mode: through the regular Photoshop or Elements tool options bar (that's if the tool you are using HAS a Blend Mode capability) or on a duplicated layer (note that a straight shot is effectively a one-layer image. A layer Blend Mode needs to interact with the pixels on the layer beneath - so you can only work with Blend Modes on a duplicated layer.

In this example I want to 'pep up' the shot of a disused workshop by adding texture.
1: I opened the master image (the peeling paint shot).
2: I opened the workshop picture, selected it all then copied it then pasted it into the master document.
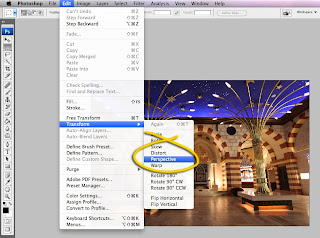
3: Step three was to resize the pasted layer so it formed a smaller image on the page (using the layer Transformation command - Ctrl + T).
4: Once resized it looked fairly normal, boring even, so I copied the base image (peeling paint) and pasted it back into the same master document to give me two peeling paint shots and one of the workshop. If the latter is not in the middle of the layer stack (check the layer palette) drag the appropriate layer to the right position.
5: To make this work, make sure that the top (peeling paint) layer is active (click it once to do this). Then change its Blend Mode from Normal to Soft Light, Overlay or maybe Hard Light.


2010 Spring Cleaning: Gear for Sale

For SALE: Panasonic Lumix FZ30
One of the best 'bridge cameras' ever released. Comes with Panasonic's awesome 12x integral zoom lens (equivalent to a 28-430mm zoom magnification), image stabilisation and eight Mp resolution.
Good condition
AUS$200

(Note: postage/freight extra. Email me for a quote)


For SALE: Canon EF 75-300mm f4-5.6 III telephoto zoom lens
Good condition
AUS $100
(Note: postage/freight extra. Email me for a quote)


For SALE: Canon EFS 18-55mm II mid-range zoom lens
Used condition
AUS$25
(Note: postage/freight extra. Email me for a quote)


For SALE: Lens Baby 2.0 (Nikon fit)
Good Condition
AUS$50
(Note: postage/freight extra. Email me for a quote)


For SALE: Mamiya 6 150mm f4.5 lens
Good condition
AUS$200
(Note: postage/freight extra. Email me for a quote)


Saturday 19 December 2009

Correcting Perspective


Unless you own an (expensive) Tilt Shift perspective correction lens you WILL get optical distortion in your work. Buildings will get thinner at the top, verticals will converge and everything will look like it's falling over backwards.

If you like shooting geometric objects like buildings, this is going to be annoying. Photoshop and many other software editing applications offer a cheaper alternative to buying a new lens.


Good news is that you can correct optical distortion quite easily using a feature called Layer Transformations. These come in several different guises: Perspective, Scale, Rotate and Distort.

Here's how it works.
I duplicated the layer, then pressed Ctrl + T (to get the Transformation handles round the image). Rght-click inside the photo to get the Transformation sub-menu (or do this via the Image>Transformation drop-down menu command).


I then chose the 'Perspective' option, 'bent' the perspective outwards by dragging the top right or left hand corner handle outwards towards the edge of the clipboard. Perspective also works vertically but for either orientation, it i s important to grab the corner handle (NOT one of the handles on a mid-point), then right-clicked again and chose 'Scale' from the Transform pop-out menu, resized the image height (because it always gets 'squashed' down a bit when the perspective is changed).

Though not perfect by any means, the final was colour corrected, then sharpened before saving.

TIP: If you plan to use this photo correction technique, it's a good idea to plan on shooting wider than normal to reduce the visual impact any subsequent resizing might have on the final image.

(Shot in the new Gold Souk, Dubai Mall, UAE, November 2009).

2nd 2010 Africa Tour


Organised through the Centre for Continuing Education (CCE) in Sydney, this 18-day photo Study Tour tour (part of Sydney Uni's Study Tours program) takes in Kenya, Tanzania and Zanzibar. The idea behind the study tour concept is to combine travel with a bunch of great photo destinations and ongoing advice and tuition through mini lectures, critiques and demonstration. It's probably the best way to learn the craft of photography. You will be travelling with other like-minded people, mad keen photographers all very enthusiastic about getting the shot, about the gear they use and most importantly, the techniques to make it all happen. Throughout the tour you also get one-on-one critiques enabling you to keep on top of your creative output and to handle any technical issues as they come along.

Tour starts March 29th, 2010, costs AUS$9,200 per person, starts in Nairobi and finishes up on April 15 in Dar es Salaam.
Price includes tuition, photo advice 24/7, all ground transport, park entry fees, most meal, all accommodation and much more.


To see a comprehensive itinerary, point your browser to:

http://www.cce.usyd.edu.au/course/ktzp