
Unless you own an (expensive) Tilt Shift perspective correction lens you WILL get optical distortion in your work. Buildings will get thinner at the top, verticals will converge and everything will look like it's falling over backwards.
If you like shooting geometric objects like buildings, this is going to be annoying. Photoshop and many other software editing applications offer a cheaper alternative to buying a new lens.

Good news is that you can correct optical distortion quite easily using a feature called Layer Transformations. These come in several different guises: Perspective, Scale, Rotate and Distort.
Here's how it works.
I duplicated the layer, then pressed Ctrl + T (to get the Transformation handles round the image). Rght-click inside the photo to get the Transformation sub-menu (or do this via the Image>Transformation drop-down menu command).
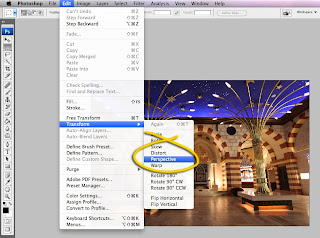
I then chose the 'Perspective' option, 'bent' the perspective outwards by dragging the top right or left hand corner handle outwards towards the edge of the clipboard. Perspective also works vertically but for either orientation, it i s important to grab the corner handle (NOT one of the handles on a mid-point), then right-clicked again and chose 'Scale' from the Transform pop-out menu, resized the image height (because it always gets 'squashed' down a bit when the perspective is changed).
Though not perfect by any means, the final was colour corrected, then sharpened before saving.
TIP: If you plan to use this photo correction technique, it's a good idea to plan on shooting wider than normal to reduce the visual impact any subsequent resizing might have on the final image.
(Shot in the new Gold Souk, Dubai Mall, UAE, November 2009).
No comments:
Post a Comment