Friday 19 February 2010

Images of Dubai

Dubai is one of those curious countries that doesn't seem to have its own identity per se, rather it sprang out of the desert, literally, and has done a lot to invent its own character out of literally nothing...

When I was a kid I used to collect stamps and I remember this region especially well because, the Trucial States as they were called in those days, and an amazing range of triangular shaped stamps. Of course I had no idea of the history of the place, only that it stems were really cool. Since 1965 or thereabouts the United Arab Emirates has developed a massive infrastructure, global trade and even a tourist industry all based on the proceeds from oil and gas. Ironically this magical source of income is about to expire so the country has seen a massive boom in the development of the tourist industry so that the country can generate its own income once the black gold has stopped flowing.

It's also one of those odd countries that you'd never think of flying to for a holiday, unless of course you live in Kharkov (the UAE is very popular with Russian tourists flying from their sub-zero Ukrainian cities to desert temperatures in excess of 40°). Although we have all seen pictures of Dubai's indoor ski slope, it's essentially the heat and the shopping that most come for. Everything in this tiny Emirate has been constructed in the last few years so, even if you think the souk you are wandering around in looks genuine, it's not! Everything is made from plasterboard and sheet metal. It looks convincing but you have to fly on to the Sultanate of Oman to find original Arabic architecture and genuine local artefacts.
I have been travelling to Dubai for six years and enjoy every moment of my time there. Why
would anyone enjoy this place when the environment is more like Disney World than the Middle East?
For a start, you'll find the people pretty friendly, the local food is excellent and, as mentioned, the shopping is exceptional. I wouldn't travel here for a taste of "the genuine Middle East" simply because that doesn't exist here. There's lots of sand but that's about as close to the Middle East as you'll get in this Emirate.
And while I'm on the subject, if you really want a taste of the Middle East you'd best travel to a country like Syria which offers incredible hospitality - despite what CNN and Time magazine might argue. In Syria you'll find people are incredibly hospitable, accommodation is spectacular in places and there's a history that goes back several millennia.
Dubai is also a very safe country because, with a Muslim culture, you'll find little or no evidence of drug abuse or the alcohol-related stupidity that we seem to take as 'normal' the Western world. Family is very important in the region and this is reflected in their warmth, hospitality and genuine interest shown towards all foreigners. You can always find negative things about the places you visit, especially when compared where you come from but it's certainly a very interesting place as a stopover on the way to Europe, for example.
Over the past couple of years I've also come to appreciate how easy it is to hop on a plane and visit other parts of the Middle East 'd never have thought of before. You can catch a flight from the adjoining Emirate of Sharjah and fly (inexpensively on Air Arabia) to destinations such as Lattakia (Syria), Muscat, Salalah (Oman), Cairo, and even destinations I'd never even heard of in the Russian Federated States.

Over the years we have visited Oman two times, Morocco once and Syria twice. This year we plan to fly into Damascus again for a few days, our third visit.
Despite my interest in countries around Dubai, there's still plenty to see and do as a photographer in Dubai. Shopping malls, 'attractions' (but NOT the giant flagpole), even the marinas have their own interest. Here are a few of the pictures I've taken over the past few years to give you an idea of what the place is like...


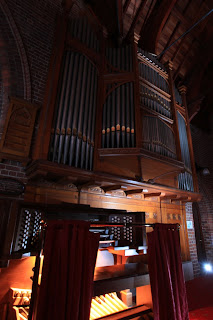
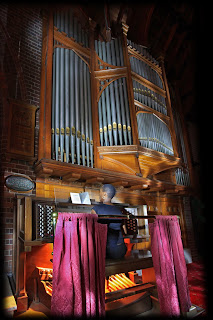


Light Painting (interiors)

One of the problems with night shooting is, once the sun has set, there's not enough light to shoot with. Or is there?
One of the things I like to do once the light goes is to make my own. Light, that is. The two best ways to do this are either use the camera's in-built flash, or with a flash light (that's a torch for all you English speaking readers!).
Though it sounds like a good thing to do, there are a few things that might ruin your evening if you don't attend to them first. On-camera flash is really handy but, as a rule, its light is only powerful enough to travel about 10 foot. After that, it's 'light's out, Nigel'. Remember, light falls off to the tune of four times over the distance travelled. In English, this physical theory nicely explains why in all those indoor flash shots you have, the light mysteriously falls off so rapidly to total darkness at the back of the shot, even though the electric lights might all be on in the room.
There are a few rules that you need to get right before you attempt to make images in very dark places:
1: Unless your subject is close to the lens, you need to work with a wide open lens aperture (to get as much light into the camera as possible)
2: Any shooting after dark must be done using a tripod. This is not negotiable! I know some people are very good at holding their camera still but, enlarge the shot to 200% in Photoshop and you'll see what I mean. No arguments!
3: If you use a tripod, you must use an electronic cable release or at least, the self-timer otherwise your shots will be blurred.
4: Don't bother to
shooting any mode other than Manual - this permits you to change aperture and shutter speeds independently. Set the aperture to a low number, then the shutter speed. If the picture comes out too dark, adjust the shutter speed for a longer exposure. If it's too light, go the other way and set a faster shutter speed.
5: Response to what light there is can be heightened using a higher-than-normal ISO setting. Start at ISO 400 and increase it to 800 if needed.

In this example, the lights had been turned off so there was barely enough (street) light to see by in the church.
Exposure was a generous f8, ISO 400 @ 30 seconds
Additional lighting was provided by moving the focused beam of light from a flashlight/torch over the scene.
Several test shots had to be made to get a good idea of the exposure. If at first you see no evidence of the torch in the 'base' exposure, it either because the torch is not bright enough, or the aperture is set too small (i.e. f16 or f22!). F-stops higher than f8 need a massive amount of light so back it off to f5.6, or less (wider).
Using a flashlight
Here's a tip I learned after buying a bunch of different torches. The only ones that are going to work for this technique are really bright ones! Don't go buying a penlight unless it's made by the LED Lenser company (www.ledlenser.com) as these are the brightest, neatest torches on the market. Most models in the professional range also allow you to focus - so you can be quite specific about where in the shot you illuminate. Pulled back to give the broadest illumination source is also a good way to give a general exposure to the scene. For example, if your total exposure time is 30 seconds, you might expose for 20 seconds using the torch at its widest diffusion then zoom in on the flash light head to focus the beam onto more specific areas for the last 10 seconds. Experimentation is needed - but that's fine.
Digital is free so go for it! Remember back with film? Every time you pressed the shutter it cost a dollar or more...
(Thanks to Tracey for being such a great model)

Sunday 14 February 2010

Even though the weather last Saturday (Feb 13th) looked worse than expected, we still went along to shoot on our planned photo walk around the Anzac Bridge and Sugar Dock areas. In fact we only got about as far as Bowman Road before the weather closed in completely but I suspect we got a few good shots in before the skies opened and forced us off the streets!

One of the biggest drawbacks to shooting in poor weather is brightness and contrast. It usually sucks so anything you see on the LCD is a big disappointment. But the trick is to make that work for you. As with most of my workshops, the emphasis on Saturday moved quickly to HDR shooting because, as a technique, it's perfect for recording a load of image detail in scenes that would otherwise be too dark or too light or 'tepid' at best. High Dynamic Range image making (HDR), for those that don't know, is technique for getting round the fact that you can't record all the tonal range in one shot - so you must shoot multiple
exposures of the same subject, then combine the best tones from all three bracketed frames using special software. It's reasonably simple to do on one level but a lot harder to get really perfect (see separate postings for more information on HDR).

You can use Adobe Photoshop Elements (8.0) to assemble one of these HDR images (using its new Photomerge Exposure feature) or Photoshop CS 3/4 (slightly easier). But the best software to do the job is Photomatix Pro, available from www.hdrsoft.com. It costs US$99, pretty much does only HDR images and is terrific. Find the three/five or seven images used in the exposure bracketing sequence, import into Photomatix, make your 32-bit HDR 'master' file (which can be saved as a special .hdr radiance file format) for use at a later time) or simply process the file into a more useable format by pressing the program's Tone Mapping button, adjusting the Strength, Colour Saturation, Luminosity, Microcontrast and other sliders to make the HDR image effect look 'hot'.

Actually, what we are technically doing by processing the files in Photomatix is lowering the bit depth (the amount of colour) in the image to make it wholly viewable onscreen. We do this because nearly all monitors are incapable of displaying high bit depth (i.e. '32-bit') colour correctly so we have to do this processing to the master file to get it to fit visually onto the regular screen bit depth. This can be a frustrating time because what we see on the screen is not always what we get once the Process button (in Photomatix) is pressed. In fact most of the images I make have to be subsequently added to Photoshop for a final editing 'tweak' - to add sharpness and to get the colour intensity just right. Note I tend to keep the Saturation slider in Photomatix well down so as not to overcook the colours. Red, in particular, is a colour that seems to record too 'hot' in Photomatix so set the colour saturation slider to 40 or less. You can always increase colours later once you get a better idea of what they are really like in Photoshop.

The rusty steel float image was made by more dramatic by underexposing the ambient light setting (using the Exposure Compensation setting set to minus one f-stop) and filling-in the foreground areas using a speedlight. You can also do this using the on-camera flash but it's harder because its output is so much lower than the speedlight's. One tip to get round this power shortage is to increase the ISO rating (i.e. from 100 to 400). This effectively makes the camera's sensor more sensitive to the flash's illumination therefore making the picture 'look' like there's actually more light than there really is, therefore effectively making the flash appear more powerful...


Wednesday 10 February 2010

Using EF Extenders

There are plenty of comments in the press that claim that the use of lens extenders is a waste of time or, at the very least, that they significant loss of quality. I wanted to see what all the fuss was about so, seeing as I was about to head off to Tanzania to shoot African game, decided to bite the bullet so to speak and try a 1.4X and a 2X lens EF lens extender for myself. (Click the photos to see full frame)

One negative feature is undeniable: use a 1.4X and you lose a full f-stop of light. Use a 2X extender and you lose two f-stops. So, before you rush to buy one of these quite expensive accessories, consider this loss of light, and therefore the possible implications to the shutter speed (and therefore to camera shake). You should also note that, with Canon products anyway, these accessories are designed specifically for 'fast' lenses. They don't work on 'regular' glass, only on lenses with fast f4 or wider apertures.

Initial tests were done using a Canon EF100-400 f4.5-5.6L IS USM lens. The manual for this product states that this works OK with the EF1.4X and EF2X extenders, but only with manual focusing. This is because lenses need light to 'see' to focus, at least enough to drive a minimum aperture of f5.6. As this is a variable aperture lens, once the 1.4X converter is fitted, the focal length becomes 140-560mm and the variable maximum apertures change, from f4.5-5.6, to f6.3 - 8, not fast enough for accurate auto focusing. With the EF2X Extender the scenario changes again, boosting the focal length to a massive 200-800mm with a scary maximum aperture range of f9 - 11.
If you have trouble seeing to focus manually, you'll have a hard time, even with the 1.4X converter. With practice, and with the help of a tripod, you'll be able to get some pretty good, sharp results.

Shooting Tips: Lens magnification varies between APS sensor cameras with a 1.6X magnification and full frame same sensors. Also the more you magnify the image, the more image problems you might see. Especially with camera shake and focus errors. To ensure sharp, clear results, always choose a shutter speed that's at least double the focal length. This means that using an APS sensor camera, you should be shooting at 1/1600s at full. And if the subject is moving fast, choose an even faster shutter speed. Because you generally can't open the aperture further to get a faster shutter speed, raise the ISO to suit.

Second lens I tried was the EF70-200mm f2.8L USM, the standard pro Canon workhorse. Both extenders worked perfectly with this faster lens. AF response is slightly compromised but, you'd be hard-pressed to quantify by how much. It's still very snappy. The viewfinder also goes a touch darker, but again, it's a negligible change.

In Use
Because of the slight
ly negative press I've seen on these extenders, I was expecting average results. I won't say using them is easy, especially if you have to focus manually, but the results appear excellent. What exactly does 'excellent' mean?

Aside from a heavier and more cumbersome lens, my chief concern was image sharpness. Sharpness is not the tack-sharp look you get with the straight EF70-200mm lens but the results are pretty good - and of course, a bit of Unsharp Masking puts most of that sharpness back into the file. I was most impressed with what I got. You will find a loss in quality if focus is not accurate and if the shutter speeds are not fast. This probably has as much to do with overall quality loss as the added 'glass'.

On closer inspection, the 2X extender does introduce some flare and some colour fringing, especially towards the edges of the sharper parts of the frame (i.e. just at the edges of the sharpest part of the focused subject). In some examples it looks a bit like the diffusion you'd get if there was a slight smear of grease on the outer lens coating.

Conclusion: Considering that you get two or more lens combinations for the price of an inexpensive ($600) extender, I think that the slight quality loss seen in the examples is eminently bearable.

Extender Negatives:
Slight softening of image
Some colour fringing along edges of focused subject
Bigger, physically longer lens
Added weight to your regular lens

Extender Positives:

Significantly cheaper option to buying a bigger magnification lens
Significantly lighter
Physically smaller than the lens it replaces
Although some loss of sharpness is recorded, much can be reinstated using an Unsharp Mask

Consider this: an EF800mm lens costs in excess of $11,000. You work it out! (Please note that all pictures here are presented full-frame, shot using a 2X Extender and are not retouched)