 One of the problems with night shooting is, once the sun has set, there's not enough light to shoot with. Or is there?
One of the things I like to do once the light goes is to make my own. Light, that is. The two best ways to do this are either use the camera's in-built flash, or with a flash light (that's a torch for all you English speaking readers!).
Though it sounds like a good thing to do, there are a few things that might ruin your evening if you don't attend to them first. On-camera flash is really handy but, as a rule, its light is only powerful enough to travel about 10 foot. After that, it's 'light's out, Nigel'. Remember, light falls off to the tune of four times over the distance travelled. In English, this physical theory nicely explains why in all those indoor flash shots you have, the light mysteriously falls off so rapidly to total darkness at the back of the shot, even though the electric lights might all be on in the room.
There are a few rules that you need to get right before you attempt to make images in very dark places:
1: Unless your subject is close to the lens, you need to work with a wide open lens aperture (to get as much light into the camera as possible)
2: Any shooting after dark must be done using a tripod. This is not negotiable! I know some people are very good at holding their camera still but, enlarge the shot to 200% in Photoshop and you'll see what I mean. No arguments!
3: If you use a tripod, you must use an electronic cable release or at least, the self-timer otherwise your shots will be blurred.
4: Don't bother to shooting any mode other than Manual - this permits you to change aperture and shutter speeds independently. Set the aperture to a low number, then the shutter speed. If the picture comes out too dark, adjust the shutter speed for a longer exposure. If it's too light, go the other way and set a faster shutter speed.
5: Response to what light there is can be heightened using a higher-than-normal ISO setting. Start at ISO 400 and increase it to 800 if needed.
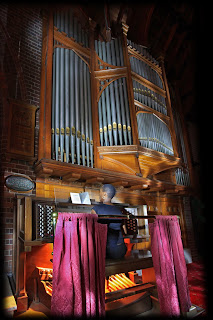 In this example, the lights had been turned off so there was barely enough (street) light to see by in the church.
Exposure was a generous f8, ISO 400 @ 30 seconds
Additional lighting was provided by moving the focused beam of light from a flashlight/torch over the scene.
Several test shots had to be made to get a good idea of the exposure. If at first you see no evidence of the torch in the 'base' exposure, it either because the torch is not bright enough, or the aperture is set too small (i.e. f16 or f22!). F-stops higher than f8 need a massive amount of light so back it off to f5.6, or less (wider).
Using a flashlight
Here's a tip I learned after buying a bunch of different torches. The only ones that are going to work for this technique are really bright ones! Don't go buying a penlight unless it's made by the LED Lenser company (www.ledlenser.com) as these are the brightest, neatest torches on the market. Most models in the professional range also allow you to focus - so you can be quite specific about where in the shot you illuminate. Pulled back to give the broadest illumination source is also a good way to give a general exposure to the scene. For example, if your total exposure time is 30 seconds, you might expose for 20 seconds using the torch at its widest diffusion then zoom in on the flash light head to focus the beam onto more specific areas for the last 10 seconds. Experimentation is needed - but that's fine.
Digital is free so go for it! Remember back with film? Every time you pressed the shutter it cost a dollar or more...
(Thanks to Tracey for being such a great model)
Digital is free so go for it! Remember back with film? Every time you pressed the shutter it cost a dollar or more...
(Thanks to Tracey for being such a great model)
No comments:
Post a Comment