Friday 27 April 2018

New UDEMY Class Published: Photo Fine Art Projects


I have just finished creating a new class called Photo Fine Art Projects.

Most of my photo students admit to not doing much with their pictures other than 'a bit of Photoshop', maybe 'a few uploads to social media sites' and perhaps a few even get to print an actual photo book. Essentially the prognosis for the life of their saved images is not good.

I'm a great fan of printing - it's one of the best ways to profile your work, to see if your digital camera is as good as the specifications claim and what''s more, displaying your work, in any format, is what photography is really all about.

No point fiddling with the pictures, then consigning them to a hard drive somewhere in the recesses of your computer system. There are so many great things you can do with them - and that's what this class is all about.


Here's an excerpt from the first lesson:

"In this class I really want to encourage students to 'have a go' at doing something completely different with their photos - certainly not just 'another bit of Photoshop then consign them to a hard drive to be forgotten forever...' type of activity, something that I suspect many of us do as a matter of habit.

I have been a huge fan of printing for years simply because this is the perfect way to show off your work - a coffee table book crammed with beautiful images not only looks great, but it's also one of the best ways of preserving your work - books don't get viruses or accidentally deleted.

But there's a lot more to the photographic craft than bookmaking. It's a great place to start but there's a massive range of other projects you can get involved with that both highlight your creativity, while freeing you up from the usual limitations of digital photography.

Here are just a few examples of what to expect in this class..."


Different MediaPrinting on canvas not only lends a strong painterly feel to the finished product but it also looks fabulous on any wall in your home...


Sumptuous WatercolourThere are many simple-to-us specialist art applications that do an amazing job of converting a regular digital image into a painted masterpiece.


LayersAnother technique I love doing is putting similar images together into a three-image tryptich.
Use this to tell more of a visual story...


Mirrored ImagesImage design also plays a big part of this class. Using your pictures to create something that's based more on fantasy rather than on always trying to create a realistic-looking result...


kaleidoscope picture effectsOne of my favourite graphic tricks is to copy and paste one (strong) image, usually architectural, back into itself several times, then rearranging and resizing the layers to give this type of eye-popping visual effect.


A photo? Or a painting?
A gorgeous contre-jour image taken to a different level using one of the best fine art applications: Dynamic Auto Painter


Use special effects filters and painting processes to create graphic images such as this in a matter of a few minutes, simply and easily...


Using a found object, a leaf from the garden.
I made this leaf propeller graphic by copying and pasting the same layer again and again, and rotating it each time to make the circular design.


Cut and PasteA very simple arrangement: three leaves picked up in the park, copied with a camera, selected and pasted into a white background to make this attractive tryptich effect.


Something from nothingIn an entirely different direction, you'll also learn how to montage completely different image elements together to create a photographic illustration like this;
a recreation of an early traveller's diary and various collected objects.

Thursday 26 April 2018

Review: FeiyuTech G5 Gimbal

Anyone shooting video should know that stability is one of the most important  technical considerations - no one really wants to look at shaky video footage. But, from my perspective anyway, few people want to travel and use a tripod either.

I bought a hand-held steadicam for a DSLR camera a few years ago. Considering it was manually operated, expensive, took quite some time to set up and balance, was heavy and, for me at least, was tricky to use, I eventually decided it had to go - which left me 'unstabilised' for several years.

These days one great solution is to use a motorised gimbal - an electrically-powered device designed to reduce and even remove, camera movement. To start with these were quite expensive but, after a couple of years development, you can now pick one up for less than $200. Plus, you can get gimbals for almost any kind of video device - from smartphones, action cameras, even for heavier DSLR cameras. 

I eventually bit the proverbial bullet and bought a FeiyuTech G5 - a model designed for a range of action cameras including the Hero 3/5/6. I paid around $250 for this electronic marvel, which ironically is 60% less than what I paid for the (expensive) heavy hand-held version I sold on Gumtree several years ago.


The G5 is compact, lightweight (270g), easy to hold, and works like a dream. Its three tiny brushless motors provide complete stability in all directions so it can be held vertically, sideways or upside down for low angle shots, with absolute stability.  It runs relatively silently - although you do have to take care that the camera is not actually touching the body as this picks up a bit of noise form the motors. Some critics say that fixing the camera onto the gimbal is also a bit of a hassle - it is simply because it's designed to take a range of different cameras that have slightly different external dimensions. But then, once it is in place, there's no need to take it off unless being used with a different device, like a tripod. To attach the camera, simply loosen the two stainless steel screws sufficiently to slide the camera into the cradle, then tighten to hold it in place. It is fiddley, plus there's a danger of losing the screws if you try doing this in a speeding safari jeep, as I did recently in Sri Lanka, but in a static environment, it's easy enough.


The G5 is also IP67 splashproof - OK, I didn't know what that meant ti I researched it online - it has the same water resistance characteristics of many smartphones. I believe that IP67 means it'll remain waterproof to a depth of one metre for up to 30mins. Hopefully I'm never going to put this to the test but it's  good to know it's resilient to water and dust ingress.

The unit is powered by one large lithium battery stored in the handle. This is charged using a supplied micro-USB cable. Feiyu Tech claims this lasts up to eight hours - I've yet to run it for that length of time but, having said that, it has never run out on me either.

Interestingly the kit also includes a short micro-USB cable which can be used to power the camera using power from the much larger lithium battery in the G5. It's fiddley to install but a nice failsafe if you find your GoPro battery dying prematurely as the G5's battery just goes and goes...


With the Hero 6 Black, I first attach the camera, then I turn the camera on by physically pressing the camera's power button, and then, using voice commands turn it Off and On when required (the Hero 6 can remain in its sleep, or its Off mode, for up to 6 hours).

Then I start the G5, it auto balances, and is ready to go. 


The handle has a four-way toggle allowing you to move the camera manually left/right, up and down. And it also has four shooting modes that can be programmed using the Feiyu Tech On app, including a selfie mode (don't laugh, it's actually really useful!),a panning and tilting mode, a 180 degree rotating mode and a reset mode.


Build quality is exceptional for the price (last time I looked, you can pick this up for less than $200) everything is beautifully machined and the unit fits in the hand perfectly.

It's easy to use - and as a nod to our different shooting requirements, it also has not one, but two tripod sockets - one on the base and one just under the top of the handle/battery compartment so it can be tripod-mounted or attached to clamps, brackets, etc.


As a final comment, you'll find the website and FeiyuTech app reasonably functional but in places, some of its programmable functions are hard to understand, and therefore hard to set. Apparently you can program the gimbal to rotate from set point to set point, over a (set) period of time.

This is used for continuous video or time-lapse sequences with an action camera - but getting this to work referencing the hard-to-understand instructions defeated me several times but I'm happy to stick with its excellent hand-held performance (see some of my included stability videos in this article).


With the app loaded, you can operate the gimbal remotely using a smartphone - it's easy and intuitive - you can also change the specifications - panning faster or slower, etc. Nice to use.


Saturday 14 April 2018

Oyen Digital USB3.0 to 2.5inch HDD Connection Cable Review

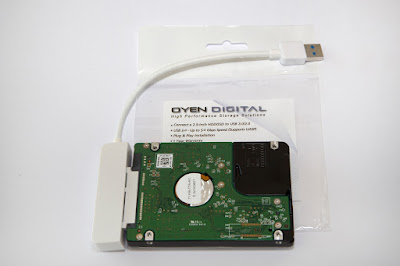
Oyen Digital cable out of the packet ready to be connected to the HDD
Like many frustrated computer users, I find that hard drives, plugs, ports and software are in a constant state of flux.
Improvements spurred on by the marketing department might say these changes benefit the users, but a lot of the time changes are mostly driven by the desire for a constant turnover. 

The improvements, if there are any, often don't necessarily improve in the same direction that we are travelling in - often they just put us in a position where we are obliged to buy more stuff to keep our old stuff running.... 

I have two reliable Western Digital Firewire 800 portable hard drives for my Mac. These have accompanied me all over the globe on my travels. However,  since I upgraded my Apple MacBook Pro, those drives have become obsolete, going the way of the Dodo - every port on the Mac is now USB-C - which is a good design but frustrating if you have legacy equipment (read a previous post about the cost of keeping up with a new computer).

Although it is possible to convert USB 3.0 ports to USB-C, it's expensive to convert Firewire to the same - this would involve buying another $80 USB-C hub with Firewire ports - so I'd have to plug my hub into another hub. 

Ironically I bought this Firewire drive from B and H Photo Video store in NYC when it was on special - and to get it back operating with my new Mac, I found the Oyen connection cable - on B and H's website while surfing for something else...
Why not just get online and buy a cheap HDD case - there are about a million online... 

I tried researching this but the hard drives in the Firewire units are fractionally thicker than regular drives, and considerably thicker than an SSD. There are a few cases about that can take 'fatter' drives but they start at around $80+.  

I might buy one of these if I need to take the Firewire drive travelling, but for the moment it's staying on my desktop.

One answer appeared as I was surfing the 'net in this brilliant little gizmo - essentially the Oyen Digital USB3.0 to 2.5-inch HDD connection cable enables me to plug any 2.5-inch drive directly into a USB 3.0 port (I'd already removed the drives from their aluminium casings).

I was nervous about doing this but actually it couldn't have been easier. Actually finding a TORX screwdriver small enough to open the casing proved more of a hassle and involved a lot of internet searching, plus a trip to Bunnings (never a bad thing to do on a wet afternoon).

With the casing unscrewed, all that's needed is to carefully slide the drive out of its interface, and pop the Oyen cable into the same position over the terminals. You can't get it wrong because the connector will only go on one way. Plug it into a USB port and it immediately reads the drive - although I had to format the original drive using Apple's Disk Utility first, which took three minutes, then it was ready to go.


For a cost of $11, I thought this was a great buy - the main disadvantage is that you have a 'naked' hard drive that is not suitable for travel but until I can find a drive case that will hold the thicker form factor, it'll work fine on my desktop. At least it has been saved from becoming yet more technological landfill.


Now that I understand what it is I'm looking at, I have seen several models of similar connection cables on offer through Aussie companies - but as I was ordering other stuff from the USA, it made sense to not have to pay another delivery fee...

Friday 13 April 2018

USB Camera Battery Charger Review

This gives you a pretty good idea how how much space and weight you might save by using a USB charger over a pair of traditional single battery chargers.
Having just come back from a very successful photo tour to Sri Lanka my attention, as always turns to the next photo tour - and luckily my next trip will be to the island of Madagascar in May. 

One feature that all travelling photographers get seriously obsessed with is the weight of their gear. My stuff probably weighs around 10 kilos, more if I carry a tripod, and yet more if I take my trusty EF300mm f2.8 lens which weighs 2.35kg out of its case.

As photographers we are forced to pack chargers: for batteries, cameras (where the battery is internal), smartphones, flash, and more. Then there's the power cables needed to connect everything together, plus the adapters and power boards. It all adds up. 


I recently read a blog by a US photographer in the same position - he'd decided the answer was to travel with only USB chargers. I thought this was a great idea and went in search of a local supplier.

Eventually I went to Photo Shop Studio, two mins from Bunnings in Ashfield, and bought a dual LP-E6 USB battery charger for a whopping $20.  I bought this a month ahead of the trip so I could test it thoroughly before heading to a country with little in terms of technology.


I drained an original Canon LP-E6 battery - to 3% charge - and set this up to charge using my Macbook Pro. With a single battery in the cradle, it went from 3% to 99% in 3.5 hours, not a bad result for a battery that has a red bar in its recharge performance indicator (i.e. three green bars indicates it's in tip top condition, two bars is 'OK' , and a red bar indicates that the battery is on its last legs...

Mine are probably 10 years old and have been worked hard so it's not surprising it was on its last legs.


Friday 6 April 2018

Apple Mac Class on UDEMY.com

I have just posted a brand new class at www.udemy.com called Apple Mac for Absolute Beginners aimed, obviously at those who have just bought a Mac who need to pick up as much as possible about the Apple system.

This class has been a long time coming and is basically the result of more than 20 years experience of using Apple products and more than five years of teaching the subject at the Centre for Continuing Education in Newtown.


https://www.udemy.com/apple-mac-for-absolute-beginners/learn/v4/overview

This online class can be completed at your leisure. It consists of more than 76 lectures extending to more than five hours viewing time and is priced at $25 - but UDEMY often offer its classes at reduced rates - at the time of writing this class was selling for only $16. A bargain. 
Apple Mac for Absolute Beginners joins my five other online classes: Adobe CC Projects, Mastering the Art of Creative Bookmaking, Learn Adobe InDesign from Scratch, Mastering HDR Picture making and Mastering Adobe Photoshop Elements, all of which are approximately the same length and cost.