 |
| I was very pleased with this shot, taken using the 840m. Colour, contrast and clarity is very good. I go back to my comments about perhaps producing a camera with fewer pixels, a larger sensor, or at least a RAW file capability. Serious point-and-shoot semi-pro cameras are a bit thin on the ground - so why not include the RAW format in the SX 30? |
The Canon PowerShot SX30 IS is the latest in a line of PowerShot super zoom cameras. It follows closely on its x10, x12, and x20 super zoom compacts. Recently I was lucky enough to be one of the first to try out his groundbreaking bridge camera.

The absolute highlight of this model is it's lens, currently the highest magnification zoom lens in the world. It's indeed impressive both on paper and physically. At the launch, just to push turned its considerable technological achievement, Canon event organizers brought along its massive EF 800mm F5.6 L IS USM super telephoto lens as a demonstration of how much 'lens' is packed into its relatively small 550g body. Clearly you cannot seriously compare a top-of-the-range L-Series lens with a $550 compact camera, but it certainly piqued interest.
Because the zoom range on this camera is so massive, and includes the latest version of its image stabilizing technology (IS) in the lens, powered by its fourth-generation DIG!C image processor. This gives the SX30 up to a claimed 4.5 stops stabilization, something that will be sorely needed when shooting with a x35 zoom lens.
 |
| Here is the same Kelp Gull, shot at full magnification. After shooting with his camera for an hour or so I found myself becoming very blasé about having a x35 magnification zoom lens. |
 |
| Kelp Gull under the boat. Just the sort of shot where you wished you had a big lens! The wide-angle end of this lens is actually a lot less impressive. Although it looks okay in this short, under close inspection you will see significant chromatic aberration toward the edges of the picture. I tried cleaning these up using ACR. It did a relatively good job but could not remove all of the aberration. Again, this goes back to my comments about using a small image sensor. It's impossible to pack so much focal length into a sensor this size without incurring some serious image aberrations. |
Another intriguing, but handy design feature is its zoom framing assist function. With a big magnification lens it's often hard to keep the subject in the frame. Inevitably you have to keep taking the camera away from your eye, checking the subject has got to, reframing on the subject, then looking through the lens again. It's frustrating. To improve the shooting experience Canon engineers have added this feature so if you lose the subject in the viewfinder, all you need do is press and hold the button on the back of the camera (next to the thumb grip) and the zoom quickly retracts to display more of the scene in the viewfinder (or the LCD). This enables you to reframe quickly without taking your eye from the viewfinder. Release pressure on the button and it reverts to the original magnification. It works well. And trust me, at 700mm+, you need a feature like this. How far back the lens retracts is set through the menu ('small', 'medium' and 'large' angle of view). Because this is a bridge camera, and not a large DSLR, you might find that getting the right button is a bit hit and miss. It's not made for big hands so I found this out pressing the Replay button more often than not. Practice makes this less of a lotto.
 |
| Not the best picture of a hawk perhaps but, then again, I was shooting through a metal grill at the zoo, something the camera designers always tell you' will cause the AF to malfunction because it doesn't know whether to focus on the grill or the subject behind it'. It didn't make a mistake. I suspect this is because the zoom magnification is so massive it threw the wires so far out of focus of the AF detectors didn't register at all (normally cameras like this rely on contrast detection to drive the focusing). I would've liked to have spent more time trying to get a better shot of this bird because it was so beautiful. Typically, it took one look at me and dropped onto the floor of the cage and disappeared in the undergrowth. So much for my career as a wildlife photographer. |
Clearly one of the biggest problems photographers will have with a big lens is camera shake. OK, it does include Canon's latest IS stabiliser technology, but only a small proportion of the people that buy this product would fully understand the need for proportional shutter speeds to get the sharpest results. Huh? An 800mm focal length needs a shutter speed of at least 1/800s to get the subject sharp. Seriously. If the subject is moving, this shutter speed should be doubled. If it's moving fast, double that figure again. Now you see how important having a 4.5 stop 'IS' is? Without stabilisation you'd only be able to use this camera in bright sunshine. As it is you still have to be very careful with handling at slow shutter speeds but, with care, I found that it can produce quite surprisingly-sharp results. The pictures of the frill-necked lizard, for example, were snapped through glass at 1/20s and yet came out pin sharp, even at F2.7. I was happy with its image stabiliser feature, but also remarked to Canon on the day, it might be so much more effective in a slightly smaller zoom. But of course, in the market it's very much a race of who can produce the most impressive features. Sometime I'd really like to see compact super zoom model with maybe a faster, 28mm to 300mm continuous aperture F2.8 lens with a 10 or 12 megapixel sensor, shooting RAW files.
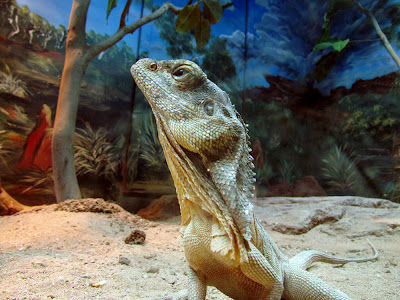 |
| Enough of the telephoto stuff. I figured I'd try the macro approach for this frilled lizard from a distance of about 5 inches. Not a bad result, considering the reflections in the glass, but a bit of Photoshop retouching helped remove those distractions nicely. What was impressive was the fact that I was in an almost completely dark room pointing the camera into a poorly illuminated aquarium. The ISO was set to 200, exposure compensation was -0.7, aperture was F2.7 which produced a shutter speed of 1/20s. The SX30 IS uses the latest image stabilisation technology which is supposed to give the camera a 4.5 f-stop advantage, suggesting that the real shutter speed was closer to 1/400s. Which explains why Mr. lizard is looking sharp and clear. It was a pretty good result. As you might expect, at this wide-angle setting, and at such a wide aperture there appears to be chromatic aberration around the edges of the image, further exaggerated by shooting through plate glass. |
 |
| Another shot that I snapped off at full (800mm) extension. I had planned this trip to the wildlife park so took along my big monopod on the day which provided excellent additional stability. |
The inclusion of a hot shoe is pleasantly surprising. I tried it with my 580EX II speedlight, so it works perfectly in E-TTL but, with such a big speedlight, it's not easy to handhold. The much smaller Canon 270EX is a better choice because it's compact and very light. Out of the box the hot shoe is nicely covered by streamlined plastic protector. I was also very pleasantly surprised to find flash exposure compensation of +/-3 f-stops, a very handy adjustment when shooting subjects up close.
 |
| 'Sushi' shot using the SX30's Miniature Mode.. |
It's metering functioned flawlessly in the less-than-easy light I was shooting in. To top it all off, as with the 60D, the PowerShot SX30 IS has a number of new (to me) Scene Modes which include a fisheye lens mode (creating funny, software-generated distortion effects) and one I personally liked a lot, a miniature effect mode, in which the upper and lower parts of the image are deliberately defocused to make the subject look as if it's a tiny scale model. It's a neat effect and I'm sure it'll be popping up everywhere in models yet to be released.
 |
| Last shot of the day, the claw of a monitor lizard. This was as close as I could get at maximum focal length: 1.4m at 840mm (1/500s@f5.8, ISO200). I think it produced a fairly credible result, although I did find that the normal process of software sharpening is not as easy because files produced by this camera can be slightly 'gritty'. This is not normal digital noise spottiness, although you do see this once the ISO is pushed past 400. It's more like a specular highlight noise, again caused by putting too many pixels on a very small sensor. You can see this even if the ISO is set to 80 so it's an inherited characteristic of the image sensor. It's not a problem as long as your sharpening procedures are carefully monitored. Again, it would've been really nice to have a larger sensor and therefore fewer artifacts, then you must have a massive magnification. Apart from this, performance is good. |
 |
| Close up of a pelican, 800mm focal length. |
Aside from shooting almost every picture in this test at a focal length of 800mm, also tried the camera's HD Video feature. It's easy to use. You simply press the red button located to the right of the viewfinder and it immediately engages. Video was recorded at 1280 x 720 (i.e. 720p) and saves the file in the handy .MOV format. You can even shoot video in miniature mode. As for the popular HD TV aspect ratio seen on other models, the HD video format is brilliant for creative composition and it's easy to use. In many of the places I was photographing him, the light was poor, so I really appreciated the image stabilizing feature. Plus, I found using a monopod certainly improved the stability significantly, for both video and stills. You can clearly see when the IS kicks-in to assist producing a steady shot. The video footage is quite good but still slightly squishy. Perhaps unfairly but when compared to 1080p video it lacks some clarity but again, considering the size of the image sensor (25mm square), it's pretty good. I suspect one reason why this camera can produce such an impressive image magnification is because the sensor is so small. It's exploiting a large crop factor that can boost the image magnification. Imagine how much better this might be if it used a 38mm or 43mm square sensor?
I like this camera because, as with almost every other super zoom before it, it claims to have everything packed inside it, and it pretty much does. Clearly, this resolution-versus-sensor size argument is something of an issue. I don't see its 14 megapixels being better than those from a 10mp PowerShot G12 however the industry, or the market, demands ever-higher resolutions so the quality-versus-features argument will continue. Also, this is currently Canon's top-of-the-range PowerShot model (aside from the G12) so why no RAW file format? I have no idea if this is an expensive addition (somehow I doubt it) but it seems to be a de-facto requirement in most top compact cameras these days so its absence here is noted.
Overall this is a great camera. It could operate faster, and it certainly could do with a RAW format, and maybe fewer pixels, but even so, on location it worked well, especially when used with a monopod for additional stabilisation. As I'm less unlikely to buy the Canon EF 800mm F5.6 lens at $10,000+, this represents a superb, lightweight and very affordable alternative.


