Wednesday 24 June 2015

Using ND Filters

How many times have we been shooting around water only to get rather average-looking water results?  In most cases any camera set to AUTO or Program Mode will produce technically near perfect results - but the photo is unlikely to stir the emotions much. 

Why? With photography, the tools we have to create a unique image are limited to: shutter speed, aperture, ISO, White Balance, and lens selection (before post-production).

This looks like a point-and-shoot image shot in Auto metering mode.
Not the sort if effect you'd hope to get with a $3000 DSLR.
(1/250s @ f5.6, ISO 200)
As you can see from the first example, that Auto mode point-and-shoot result is yawn-making.  It's just not interesting.  OK, I could try a different lens, or point of view, but the content is most likely still going to lack interest.  This is partly because I have neither frozen the motion of the water to give razor-sharp water droplets, nor has the camera created that dream-like smokey water effect you often see associated with a long exposure.
Cameras are not designed to make these creative decisions for you.
One way to inject more interest in a coastal image like this is to radically slow the shutter speed to give an ethereal, misty effect, as the tide washes in and out over the rocks.  To do this you must create a very long shutter speed, preferably lasting more than a second.  If the shutter speed is shorter than this the effect might look a bit half-hearted.  Longer, and the image really transforms...

Same scene as above, but now looking 100% more interesting.
An ND1000 (10 stop) filter produces a radically different look.
Actually I think it's too fluffy - the water sloshed in and out of this little rock pool several times during the 20 second exposure
(f22, ISO100)
In typical light, merely setting the ISO to 100 (lowest in the camera) and the aperture to the smallest hole (f22 - though note that some longer tele lenses might stop down to f29 or even f32) is not sufficient to slow the shutter speed to give anything other than a semi-blurry effect.

The answer is to add a Neutral Density filter on the lens.  These are made in different strengths to suit a range of applications - but their descriptive names can be confusing.  For example, an ND8 filter reduces the amount of light passing into the lens by three f-stops.  Sounds useful, but in fact, it's not a lot for the purposes of this very long shutter speed exercise.
The most common ND filters you see advertised are ND4, and ND8 filters (two and three f-stop reductions respectively).  These won't have enough impact to make a significant visual impact on these seascapes.

Here's a list of ND filters and their light stopping characteristics:
ND2                   1 stop
ND4                   2 stops
ND8                   3 stops
ND16                4 stops
ND 32               5 stops
ND 64               6 stops
ND 100            7 stops
ND 200            8 stops
ND 500            9 stops
ND 1000         10 stops

This is just one of the descriptive scales used by filter makers to describe what an ND filter does.  I think it's the clearest description (I am using HOYA PRO filters).  Another description you might see includes the optical density. So, 0.3 is equal to one f-stop, 0.6 is two stops, 0.9 is three stops, and so on.
What else can we use ND filters for?
- Slowing the shutter speed
- Stopping light so we can shoot using a wide aperture in bright light
- Used as a way of controlling exposure when shooting video (because when shooting video, you can only change the apertures, NOT the shutter speeds).

Pitfalls
One of the problems you'll find when using dark ND filters (ND64, ND500 etc) is that it is impossible to SEE through the viewfinder to check on focus.  It's so dark the camera is unlikely to be able to focus either.
- Switch to Manual focus (MF)
- Focus first, THEN screw the ND filter onto the lens
- Alternately use the Live View function to check focus (this might not work on all cameras).
- Metering does not work well either.  Best case scenario is to choose Aperture Priority mode, select an aperture and note the shutter speed.
Add the ND filter, and in manual metering mode, reset the shutter speed with the filter factor to extend the exposure by 2, 3, 4, 5, 6 or even 10 f-stops, depending on the the filter used.

Dee Why rockpools by Natalie Hitchens,
(5s @ f29, ISO 100)
Dee Why cliffs by Natalie Hitchens
(5s @ f29, ISO 100)
Tidal pool, Mona Vale, by Natalie Hitchens
Three exposure HDR
(ND64 filter, 30s, 15s and 8s)
Tidal pool, Mona Vale,
ND 1000 (10 stops)
(30s @ f22, ISO 100)
Tidal pool, Mona Vale,
NO FILTER
Camera set to AUTO metering mode giving a not very interesting result
Tidal pool, Mona Vale,
ND 1000 (10 stops)
(15s @ f13, ISO 100)
Tidal pool, Mona Vale,
No Filter, AUTO metering mode
(1/160s @ f9, ISO 100)
Tidal pools, Mona Vale
ND1000 (10 stops)
(20s @ f16, ISO 100)
Tidal pools
Shot using AUTO metering mode
(1/320s @ f9, ISO 100)


Friday 19 June 2015

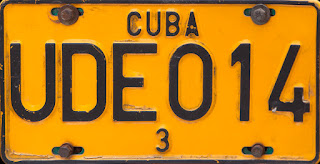
Cuba Photo Tour, 3-19th April, 2016

Here's is the itinerary for my 2016 Photo Tour to Cuba!

Please note this is a brief overview of what this tour comprises.
Email me at betterdigitalmag@gmail.com for the full itinerary and more information.


Itinerary in BriefDay 01 [Sunday 3rd, Arrival Day]

Reception and welcome at the airport and transfer to the 4-star Art Nouveau style Hotel Raquel in old Havana

Day 02 [Mon 4th] Colonial Havana
- Try a mojito in the La Bodeguita del Medio
- Visit to the Capitanes Generales Museum
- Visit to the Rafael Trejo Boxing Gym
- A visit to the Cementerio de Cristóbal Colón cemetery
- Dinner at the restaurant El Aljibe in Miramar

Day 03 [Tues 5th] Havana
- Visit the Agromercado [market]
- Fusterlandia  - impressive art of Jose Fuster
- Havana Queens - meet the dancers behind the scenes
- Cocktail at the Salon de la Fama (Hotel Nacional)
- Visit the impressive Morro-Cabana fortress
- Old Man and the Sea: Hemingway museum
- Check out the beach at Playa Del Este
- Dinner at the paladar La Guarida.


Day 04 [Wed 6th] Bay of Pigs - Cienfuegos
- Visit the Bay of Pigs invasion museum in Playa Giron
- Boat tour to Aldea Taina, a [reconstructed] native Indian village.
- Visit to Cueva de los Peces sinkhole near Playa Giron.
- In Cienfuegos, check out the Tomas Terry theatre
- Enjoy a sundowner cocktail in the Palacio de Valle.
- Dinner at the private restaurant Aché.

Day 05: [Thurs 7th] Cienfuegos - Trinidad
- Boat trip around Cienfuegos Bay
- Visit to Jagua Castle (Nuestra Señora de los Ángeles)
- Visit Cienfuegos Botanical Garden
- Dancing Lessons in Trinidad!
- Dinner reserved at the private restaurant 1514.


Day 06 [Fri 8th] Trinidad
- Visit to the Casa del Alfarero ceramics workshop.
- Check out the amazing antiques at the Romantico Museum (Palacio Brunet)
- Visit to the Casa Templo de Santería Yemayá
- Dinner at Vista Gourmet, a private restaurant
- Entrance to the 
Casa de la Trova.  Great live music. 
 

Day 07 [Sat 9th] Sancti Spíritus - Camaguey
- Valle de los Ingenios
- Climb up the Torre Manaca Iznaga, a slave tower
- Stop in Sancti Spiritus to see the historic Yayabo bridge
- Bici pedalo taxi roundtrip in Camagüey city
- Visit to a local fruit and veggie market
- Visit the Casa de Arte Jover art gallery
- Visit to the Camaquito kidsproject
- Dinner at the La Campana de Toledo in Camagüey. 

Day 08 [Sun 10th] Bayamo El Cobre - Santiago
- Special visit to the Camaguey Ballet
- Visit the Basílica del Cobre pilgrimage spot
- Visit to the (bullet riddled) Moncada Museum
- Tour with horse carriage from Hotel Sierra Maestra to the Casa de la Trova


Day 09 [Mon 11th] Santiago de Cuba
- Visit to the Casa Diego Velazquez museum
- Museum Casa de las Religiones Populares
- Visit to Santa Ifigenia cemetery
- Roundtrip transfer by ferry to Cayo Granma
- Dinner at the private restaurant Compay Gallo.
- More great live music at the Casa de la Trova in the city.

Day 10: [Tues 12th] Guantánamo - Baracoa
- Visit Matachin Fortress
- Catedral Nuestra Señora de la Asunción
- Overnight Hotel El Castillo, Baracoa

Day 11 [Wed 13th] Baracoa
- Visit to Finca Duaba (a working cacao plantation)
- Excursion on the Rio Toa by boat   
- Dinner at private restaurant Al´s, which is famous for its lobster dishes and fantastic views.

Day 12 [Thurs 14th] Baracoa - Guardalavaca
- Stopover at the Alexander Humboldt National Park
- Moa and the gorgeous beaches of Guardalavaca.

Day 13 [Fri 15th] Guardalavaca
- Day Off, on the beach
- Overnight Hotel Sol Río de Luna y Mares


Day 14 [Sat 16th]  Holguin - Havana
- Transfer Havana Airport – Havana Hotel
Overnight Hotel Raquel

Day 15 [Sun 17th] Havana
Today is free - but I shall be organising trips for those interested to:
- Havana’s unique Steam Rail Museum
- The Revolution Museum
- Visit to the Patacas cigar factory
- Farewell dinner (location TBA) + drinks at the famous
La Floridita bar (another Hemingway hangout, and supposedly home to the original daiquiri). Overnight Hotel Raquel


Day 16 [Mon 18th] Havana
Today is free - but I shall be organising trips for those interested to:
- Art Deco tour of HavanaOvernight Hotel Raquel


Day 17 [Tues 19th] Havana - Onwards
- Hotel check-out and transfer (depending on time of departure) to the airport to check-in for the return flight.  Transfer without guide in taxi or microbus.


Cienfuegos at night
(Composite image)

Cost:
$5,850 per person (price based on twin share).
$880 single supplement
Tour start: April 3rd, Hotel Raquel, Havana, Cuba, 2016.
Tour finish: April 19th, Hotel Raquel, Havana, Cuba, 2016.
Deposit:     $500 to secure your booking (note this is non-refundable from Jan 03, 2016).
(We advise you to take travel insurance as soon as a booking deposit has been made).
Tour size:    Minimum 8 pax, max 12 places.
Photo skill level required: Absolute beginner, up
What’s included:
•  Photo tuition and guidance for the entire trip, plus tuition pre-, and post trip, where required.
•  14-day guided tour, as per itinerary, from/to Havana with aircon bus, driver and English-speaking guide.
•  Internal flight from Holguin to Havana.
•  Accommodation 16 nights, w/breakfast.
•  Nine dinners, 16 breakfasts + one picnic lunch.
•  Entrance fees for all locations mentioned in the itinerary.
•  Farewell group dinner in Havana (15th April).
•  All tips.
•  Loads of fun, great photographs and a memorable trip!
What’s not included: •  International airfares.
•  Travel insurance.
•  Items of a personal nature.

(Please note: This itinerary is meant as a guide only.  Locations and places might change depending on local conditions once we are in Cuba.  Plus I also reserve the right to modify the locations visited if I subsequently find places that are better value or more interesting to photograph.  A final itinerary will be provided one month before departure). 


Sunday 7 June 2015

House Construction Photo Project #3

It's June and the house construction progresses at a painfully slow process.  Dogged by some bad weather and unforeseen problems, the digging and scraping of the foundations continues.  At one point last month the builder had to get a pump to remove the water from the garage excavation (swimming pool).  I decided to make a time lapse video of the excavations and the concrete pouring.
Time lapse is used to compress time - for example, you shoot one frame a second for 20 minutes then play it back at 15 or 20fps to speed up the passage of time.  In this way you can easily illustrate something that takes a long time in real life, in a very short time onscreen.  You can also just shoot video and speed it up 1000%, or more, but even with the best settings, you'll find you can only run the video for a short time, then the DSLR either stops, jumps to another (recorded) block on the memory card, or develops overheating issues with the sensor.
In both these examples I added some shorter video clips into the time lapse sequences.  All in all I shot some 4,000 frames in the first video and 5,000 frames for the second. 


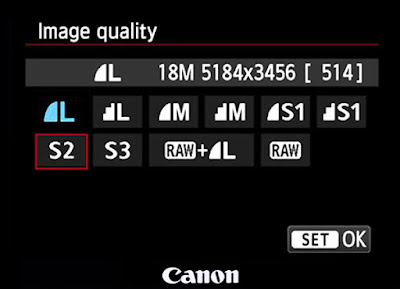
Typical Canon DSLR resolution options
S1 = 2592 x 1728 (4.5 MP)
S2 = 1920 x 1280 (2.5 MP)
S2
is perfect for standard HD resolution time lapse and stills
for Vimeo and YouTube productions
S3 = 720 x 480 (0.35 MP)
 
One good trick is to choose the lowest resolution setting otherwise your camera's memory card simply cannot keep up with the date rate (unless the time lapse is set to let's say, one shot per 20 seconds, in which case there's no problem - but you will have to reduce the resolution in the video processing software so it's better to do it at the time you capture the stills. Most Canon cameras have three resolution settings: Large, Medium and Small. They'll also have two or three different 'small' settings, including 1920x1280 pixels - which is HD video - perfect for time lapse.