 Regardez les AF points
One highly useful feature you’ll find buried away in the menus of some of the better D-SLRs is to have the AF points displayed on the frame that’s just been shot. You can then display the image on the camera LCD and see immediately if it focused in the right place, or not. I use this a lot and find it very effective, especially if shooting on the run and when I don’t have a lot of time for introspective LCD inspections.

Run out of light? raise the (ISO) sensitivity
It sounds like a miracle. If there’s not enough light, if you can’t open the lens aperture any more than it already is and you don’t want a slower shutter because there’s no tripod, you can pretend to the camera that there’s more light than there really is by increasing the sensitivity of the sensor. This in turn allows the camera to choose a faster shutter speed, preventing camera shake and saving the day. The big downside of this is that the picture often suffers excessive graininess, a feature called digital noise. The smaller the image sensor, the more acute this is likely to become at high ISO numbers. The newer the technology however, the less disturbing it is because the software that processes it is so good. Here’s a great example taken using the Canon EOS 5 MkII at ISO 100 (blurred) and then at ISO3200 (not blurred!)
It sounds like a miracle. If there’s not enough light, if you can’t open the lens aperture any more than it already is and you don’t want a slower shutter because there’s no tripod, you can pretend to the camera that there’s more light than there really is by increasing the sensitivity of the sensor. This in turn allows the camera to choose a faster shutter speed, preventing camera shake and saving the day. The big downside of this is that the picture often suffers excessive graininess, a feature called digital noise. The smaller the image sensor, the more acute this is likely to become at high ISO numbers. The newer the technology however, the less disturbing it is because the software that processes it is so good. Here’s a great example taken using the Canon EOS 5 MkII at ISO 100 (blurred) and then at ISO3200 (not blurred!)
Auto focus, or manual?
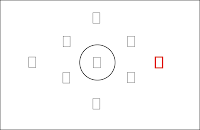
One of the best technologies to hit the stores in recent years is called variable AF points.
Traditionally we focused a picture by placing the centre AF spot (in the viewfinder) over the subject and rotating the lens barrel till it became sharp in the eyepiece. Once auto focus (AF) modes hit the stores a few years back this process became automatic and much faster.
Traditionally we focused a picture by placing the centre AF spot (in the viewfinder) over the subject and rotating the lens barrel till it became sharp in the eyepiece. Once auto focus (AF) modes hit the stores a few years back this process became automatic and much faster.
With each new technological development the process of focusing just got quicker and more accurate. Then we got multiple AF points. In this case the camera’s ‘brain’ or CPU (Oh! my God, it’s got a brain?) takes a reading from several AF points in the viewfinder and averages the results out to (hopefully) give more reliable focussing information. We are now up to nine, or more, different AF points (some of which are called Assist Points designed to make low light response less fretful). In most examples these AF points can be shifted manually so that you can move emphasis to only the left-hand part of the viewfinder if shooting a racing event, for example. Or it can be locked off to the bottom part of the viewfinder for landscape shooting. It’s a great feature but, if you are none the wiser about how it all works, it can also work against you.
I’ve lost count of the times I’ve been asked to “fix the AF points”. The centre AF setting comes unstuck (usually because the Lock lever is shifted to ‘Off’ by mistake). I was at a Sumo competition in Hakata last year and was approached by a Westerner asking if I knew how to fix his camera - the AF points on his Nikon had been unlocked and shifted over to the far right-hand side of the frame making it very difficult to get the correct focus - especially when the contestants moved to the right-hand part of the ring! If set wrong, the result will more than likely be out of focus. It’s also annoying if you are trying to control the depth of field effects when using low aperture numbers (like f1.4) and your AF persistently locks onto the wrong part of the subject. My solution is to lock the AF point to work in the centre of the frame only and to then go manual. Turn the AF off and manually focus the lens. This is slower, but it’s more accurate.
I’ve lost count of the times I’ve been asked to “fix the AF points”. The centre AF setting comes unstuck (usually because the Lock lever is shifted to ‘Off’ by mistake). I was at a Sumo competition in Hakata last year and was approached by a Westerner asking if I knew how to fix his camera - the AF points on his Nikon had been unlocked and shifted over to the far right-hand side of the frame making it very difficult to get the correct focus - especially when the contestants moved to the right-hand part of the ring! If set wrong, the result will more than likely be out of focus. It’s also annoying if you are trying to control the depth of field effects when using low aperture numbers (like f1.4) and your AF persistently locks onto the wrong part of the subject. My solution is to lock the AF point to work in the centre of the frame only and to then go manual. Turn the AF off and manually focus the lens. This is slower, but it’s more accurate.
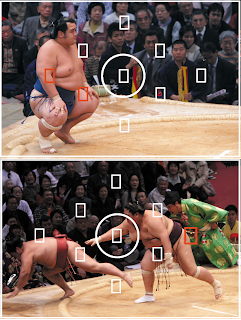
Sumo shots: This is what Canon EOS AF points look like - there are nine, but currently it’s locked onto the right-hand AF point only. Wrong place in the screen so the subject won’t be correctly focused. I’d miss the shot. In its Auto mode, it’s more likely to lock onto the subject (at left), or you could manually focus or move the AF point to the left hand side of the viewfinder to ensure the bits you want to get sharp, are focused and therefore sharp.
Another thought is that different lens focal lengths give quite different focus effects. For example, we typically use wide-angle lenses to ‘get everything in’. They are favoured by architectural and landscape shooters, in fact, anyone needing to pack a lot of data into the scene. One of the attractive features about a wide-angle lens is that you really don’t need to think about focusing too much. Its chief characteristic is that, even with a modest aperture number (i.e. f8), its depth of field is good. So you don’t need to try hard to get everything sharp in the frame, from the front to the back. Conversely, the more powerful the telephoto lens, the less depth of field you get. This too is a very good characteristic, as long as you are aware of it at the time of shooting. We use telephoto lenses at wide open apertures (f2.8) to make everything behind, and in front of the subject go completely out of focus, so the subject is isolated. It’s a powerful, creative photo technique.
No comments:
Post a Comment